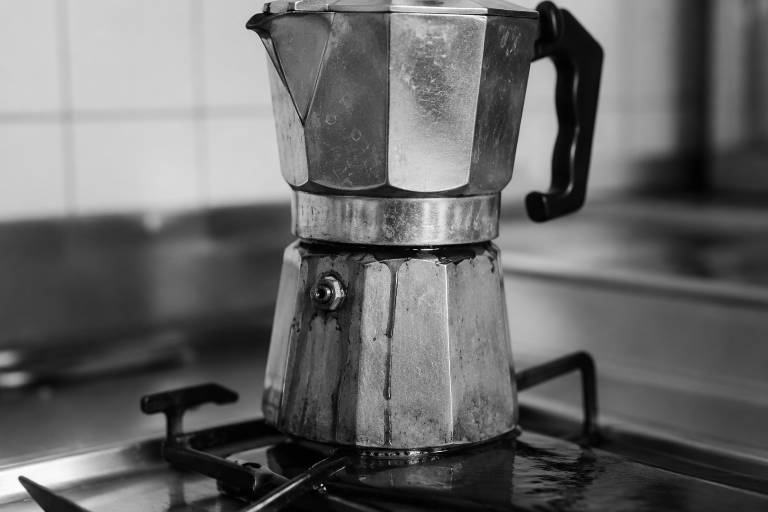
Nothing kills the smell of fresh morning coffee faster than a puddle of hot water spreading across your stovetop.
A leaking moka pot is one of the most common brewing problems people run into, and the fix is usually simpler than you think.
The cause almost always comes down to one of a handful of parts: a worn gasket, a loose connection, coffee grounds stuck where they shouldn’t be, or a clogged safety valve.
This guide walks through every type of moka pot leak, what causes it, how to fix it, and how to stop it from coming back.
Quick Answer
Most moka pot leaks happen at the seam where the top and bottom chambers connect, and a worn or damaged rubber gasket is the number one cause.
Check the gasket first. If it feels stiff, cracked, or no longer flexible, replace it. Replacement gaskets cost $3 to $6 and take about two minutes to swap.
If the gasket looks fine, read on for five other causes and the exact steps to fix each one.
Where Is Your Moka Pot Leaking From?
Before grabbing a replacement part or tightening anything, take a close look at where the water or steam is escaping.
The location of the leak tells you exactly what’s going wrong inside the pot.
| Leak Location | What It Looks Like | Most Likely Cause |
|---|---|---|
| Side seam (between chambers) | Water or steam hissing out where the top screws onto the bottom | Worn gasket, loose connection, or coffee grounds on the rim |
| Safety valve (small knob on the bottom chamber) | Water dripping or steam shooting from the valve | Overfilled water, clogged valve, or grind too fine |
| Spout or top | Coffee sputtering out before brewing finishes | Pressure buildup from blocked filter or compressed grounds |
Once you know the leak location, you can skip straight to the right fix below.
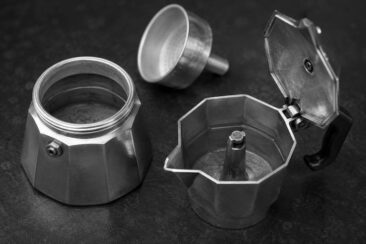
What Causes a Moka Pot to Leak at the Side Seam?
A hiss of steam from the middle of the pot, right where the two chambers meet, is the most common type of moka pot leak.
That seam relies on the rubber gasket to create an airtight seal under pressure.
When the gasket fails, steam and water push through the gap instead of traveling up through the coffee and into the upper chamber.
Here are the four most common reasons for a side-seam leak:
- Worn or damaged gasket: The rubber hardens, cracks, or loses flexibility over time from repeated heat exposure. A gasket that feels stiff instead of springy can no longer seal the pot.
- Coffee grounds stuck on the rim: A few stray grounds sitting between the gasket and the rim of the bottom chamber will break the seal, no matter how tightly you screw the pot together.
- Loose connection: The top and bottom chambers need firm hand pressure to compress the gasket. If the connection is even slightly loose, steam finds a way out.
- Misaligned filter plate: The metal filter plate sits above the gasket inside the top chamber. If it’s crooked, warped, or missing entirely, the gasket can’t seat properly against the bottom chamber.
Quick Tip After filling the coffee basket, run your finger around the rim of the basket and the top edge of the bottom chamber. Brush away any stray grounds before screwing the pot together. This one habit prevents a surprising number of leaks.
What Causes a Moka Pot to Leak From the Safety Valve?
The small metal valve on the side of the bottom chamber is a pressure release designed to prevent dangerous buildup.
If water drips or steam shoots from that valve, the pot is telling you something is wrong with the pressure balance.
Overfilling the water chamber is the most frequent trigger.
Water should sit just below the safety valve, with a visible gap of about 3 to 5 millimeters between the water line and the valve opening.
A clogged valve can cause the same symptom, since mineral deposits or old coffee residue can jam the valve’s internal spring and prevent it from closing fully.
The third cause is a grind that’s too fine, which creates a dense puck in the filter basket and forces pressure to build higher than normal.
Common Mistake Filling the water all the way to the valve, or slightly above it, forces water out through the valve the moment pressure starts building. That dripping sound you hear before the coffee even starts flowing is your first warning.
A standard moka pot generates around 1 to 2 bars of pressure during brewing, far less than the 9 bars in an espresso machine.
If something blocks the normal path upward through the coffee, even that modest pressure will escape wherever it can find an opening.
How to Fix a Moka Pot That Leaks From the Gasket
Replacing the gasket is the single most effective fix for a side-seam leak, and it takes less than five minutes.
Pry the old gasket out of the groove inside the top chamber using the handle of a spoon or a butter knife.
Clean any dark residue or old coffee oils from the groove with a soft cloth and a splash of white vinegar.
Press the new gasket evenly into the groove, making sure it sits flat all the way around without any bunching or overlap.
Screw the pot together by hand until snug, then add about a quarter turn more.
Do not use pliers or excessive force, since over-tightening can deform the gasket and strip the threads over time.
Run a test brew with just water and no coffee to confirm the seal holds before your next real cup.
Replacement gaskets cost between $3 and $6 for a single gasket, or around $10 to $15 for a multi-pack of three to five.
Beginner Note Match the gasket size to your moka pot’s cup size. A 3-cup gasket will not fit a 6-cup pot. Check your pot’s manual or measure the inner diameter of the top chamber before ordering.
The general recommendation is to replace your gasket every 6 to 12 months with regular use, or every 3 to 6 months if you brew daily.
Silicone gaskets tend to last longer than standard rubber ones, so consider upgrading if you find yourself replacing gaskets often.
You can find replacement gaskets on Amazon, at specialty coffee stores, or directly from manufacturers like Bialetti.
How to Fix a Moka Pot Leaking From the Safety Valve
Start by checking the water level.
Pour out enough water so the surface sits about 3 to 5 millimeters below the valve, and no higher.
If the water level is correct and the valve still leaks, the valve itself is likely clogged.
Carefully clean around and inside the valve opening with a toothpick or the tip of a paper clip to clear any mineral buildup or coffee residue.
For stubborn deposits, fill the bottom chamber with a mixture of water and lemon juice, let it sit for 30 minutes, then rinse thoroughly.
| Valve Symptom | Likely Cause | Fix |
|---|---|---|
| Dripping during early heating | Water level too high | Pour out water until it’s below the valve |
| Steady steam release during brew | Clogged valve or too-fine grind | Clean the valve; coarsen the grind |
| Valve hisses but coffee still brews | Minor buildup | Descale with lemon juice or white vinegar |
| Valve stuck open or won’t reseat | Worn internal o-ring | Replace the valve or the entire pot |
If the valve continues leaking after cleaning, a small rubber o-ring inside the valve may have hardened or cracked.
Some higher-end moka pots sell replacement valves as separate parts, but for many models, a damaged valve means it’s time for a new pot.
Why Grind Size Can Cause Your Moka Pot to Leak
This one catches a lot of people off guard.
Coffee ground too fine, closer to espresso fineness, packs tightly in the filter basket and blocks the normal flow of pressurized water upward.
When the water has nowhere to go, pressure builds inside the bottom chamber until it forces its way out through the weakest point: the side seam or the safety valve.
The ideal moka pot grind sits between drip and espresso, coarser than what you’d use for a portafilter but finer than a standard drip filter.
If you’re buying pre-ground coffee labeled “espresso,” it may be too fine for a moka pot.
Quick Tip After filling the basket, level the grounds by sweeping a finger across the top. Never tamp the grounds down. Tamping creates a dense puck that mimics a too-fine grind and causes the same pressure problems.
You should see grounds that look like fine sand, not powdery dust.
If your current grind feels dusty between your fingers and your pot leaks or sputters, try one step coarser on your grinder and brew again.
How to Prevent Your Moka Pot From Leaking
A few small habits after each brew will keep most leaks from ever starting.
Rinse the pot after every use with warm water and wipe it down with a soft cloth, paying attention to the gasket groove and the threads where the two chambers connect.
Leftover coffee oils and grounds harden over time and create tiny gaps in the seal that get worse with every brew.
Here is a simple maintenance checklist:
- [ ] Wipe the rim of the bottom chamber clean before each brew
- [ ] Brush stray grounds off the gasket and filter plate
- [ ] Rinse all three chambers with warm water after each use
- [ ] Descale with lemon juice or white vinegar once every two to four weeks
- [ ] Inspect the gasket for cracks, stiffness, or discoloration once a month
- [ ] Check the safety valve for clogs or mineral buildup monthly
Common Mistake Screwing the pot together tightly for storage compresses the gasket when it’s not being heated, which can flatten and deform it faster. Store the pot loosely assembled or fully disassembled with the chambers separated.
Using filtered or distilled water reduces mineral deposits inside the chamber and around the valve, which means less buildup and fewer clogs over the life of the pot.
If your tap water is particularly hard, you’ll notice white or chalky residue forming faster, and descaling every two weeks instead of four will help.
When to Repair and When to Replace a Leaking Moka Pot
Most moka pot leaks are fixable with a new gasket, a quick cleaning, or a small adjustment to your routine.
A $5 gasket swap solves the majority of side-seam leaks, and clearing out a clogged valve takes about ten minutes with a toothpick and some vinegar.
Replacement makes more sense when the damage goes beyond wearable parts.
| Problem | Repair or Replace? | Why |
|---|---|---|
| Worn or cracked gasket | Repair | Gaskets are cheap and easy to swap at home |
| Clogged safety valve | Repair | A toothpick and descaling solution usually clears it |
| Coffee grounds on the rim | Repair | Just wipe it clean before brewing |
| Stripped or cross-threaded chambers | Replace | Damaged threads cannot be repaired on a moka pot |
| Warped or dented bottom chamber | Replace | A warped chamber will never seat the gasket evenly |
| Safety valve stuck permanently open | Replace | A faulty safety valve is a safety risk |
| New gasket still leaks | Replace | Internal warping or invisible thread damage is likely the cause |
If your pot has damaged threads that make it hard to screw the chambers together smoothly, no amount of gasket swapping will fix the leak.
A warped bottom chamber, often caused by overheating on a too-high flame, creates an uneven surface the gasket cannot seal against.
If you’re dealing with pressure problems that don’t respond to any of the fixes above, or if your pot shows visible cracks, corrosion, or pitting in the aluminum, replacing the pot is the safer and cheaper long-term choice.
You can avoid many of these problems by handling the pot gently, never forcing the threads, and using medium-low heat instead of a high flame.
A Leaking Moka Pot Is Almost Always a Quick Fix
That puddle on your stovetop doesn’t mean your moka pot is ruined.
Nine times out of ten, the fix is a new gasket, a cleaner rim, or a slightly coarser grind.
Spend five minutes checking the gasket and wiping down the seal surfaces before your next brew, and the leak will most likely disappear.
The only time to start shopping for a new pot is when the threads are stripped, the body is warped, or the safety valve refuses to close.
Everything else is a $5 repair and a small change in your morning routine.