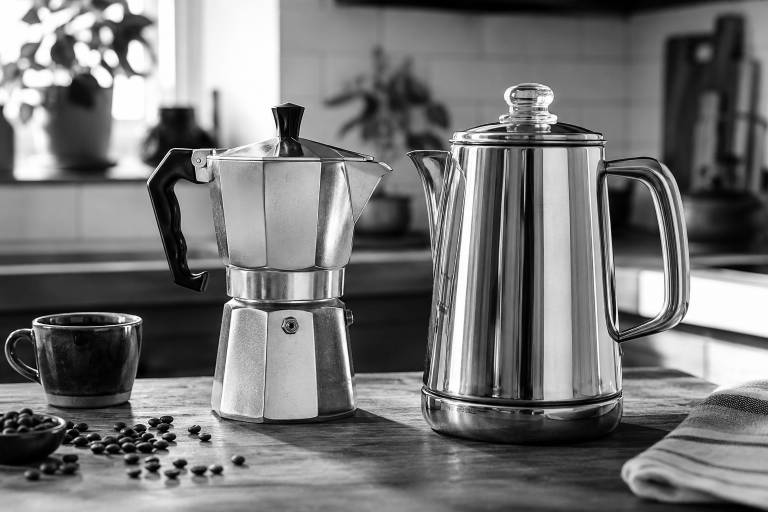
A moka pot and a percolator look like distant cousins sitting on the same stovetop, and that resemblance trips up a lot of coffee buyers.
One pushes pressurized water through a compact bed of fine grounds in under five minutes, filling the kitchen with a sharp, concentrated aroma.
The other cycles boiling water through coarse grounds again and again, releasing a rounder, mellower scent that lingers for the entire brew.
The coffee they produce tastes wildly different, and choosing the wrong one can mean months of disappointing cups.
This comparison breaks down every difference that matters, from flavor and brew pressure to camping durability and long-term cost.
Quick Answer
A moka pot brews concentrated, espresso-style coffee at 1 to 2 bars of pressure in about four to six minutes, using fine to medium-fine grounds. A percolator cycles boiling water through coarse grounds over seven to ten minutes to produce a milder, high-volume brew closer to drip coffee. Pick the moka pot for strong, small-batch cups and the percolator for serving larger groups with less fuss.
How the Moka Pot and Percolator Brew Coffee Differently
The moka pot, patented in 1933 by Luigi De Ponti and marketed by Alfonso Bialetti, brews coffee through a single upward pass of pressurized water.
Cold or preheated water sits in the lower chamber, and as the stovetop heats it, steam pressure builds and forces that water up through a basket of fine grounds.
Brewed coffee collects in the upper chamber with a soft hissing sound, and the entire extraction happens in one cycle.
No brewed coffee ever touches the grounds a second time.
A percolator works in the opposite direction.
Water in the bottom boils, rises through a central tube, and drips over coarse grounds in a basket near the top.
Gravity pulls the brewed liquid back down into the lower chamber, where it heats again and repeats the loop.
This continuous cycling goes on for seven to ten minutes, or until you pull it off the heat.
The longer the percolator runs, the stronger and more bitter the coffee becomes.
Common Mistake Leaving a percolator on the heat for more than ten minutes almost guarantees an over-extracted, ashy cup. Set a timer and remove it as soon as the glass knob shows a steady dark amber color.
Moka Pot vs Percolator Taste: Which Flavor Wins?
Moka pot coffee hits the tongue with a dense, syrupy body and a roasty sweetness that sits somewhere between drip coffee and true espresso.
You can taste chocolate undertones and a slight nuttiness when you use a medium or medium-dark roast.
That single-pass extraction keeps the flavor clean and layered, pulling oils and aromatics without recycling them through spent grounds.
A well-brewed moka pot cup carries a faint caramel finish that lingers after each sip.
Percolator coffee, by contrast, delivers a bold, full cup with a smoother start that can tip into bitterness if the timing runs long.
The repeated cycling washes out subtler flavor notes, leaving a straightforward, punchy taste that many people associate with old-school diner coffee.
You will notice a heavier roasted grain flavor and less acidity compared to what the moka pot produces.
Some drinkers describe percolator coffee as “warm and familiar,” like the smell of a cabin kitchen on a cold morning.
If you prefer a cup you can sip black and still catch distinct origin flavors, the moka pot wins.
If you want something sturdy enough to stand up to cream and sugar without losing its presence, the percolator delivers.
Pairing the right roast level with each brewer makes a noticeable difference in what ends up in your mug.
Medium-dark beans in a moka pot bring out bittersweet cocoa and toasted almond, and medium or light roasts in a percolator preserve some brightness without tipping into sourness.
A side-by-side taste test with the same beans in each brewer makes the gap obvious on the first sip.
| Category | Moka Pot | Percolator |
|---|---|---|
| Body | Dense, concentrated | Full, rounded |
| Bitterness | Low to moderate (if timed well) | Moderate to high (rises with brew time) |
| Flavor complexity | Higher, origin notes come through | Lower, flavors blend into one bold profile |
| Closest comparison | Strong espresso-style shot | Traditional diner-style drip coffee |
| Best roast pairing | Medium to medium-dark | Medium to light |
What Grind Size Does Each Brewer Need?
A moka pot performs best with fine to medium-fine grounds, roughly the texture of table salt.
Grinding too coarse lets water rush through without extracting enough flavor, producing a thin, watery cup.
Grinding too fine creates a dense puck that traps pressure and can cause the safety valve to release, or it pushes bitter, over-extracted coffee into the upper chamber.
A quality burr grinder set two or three clicks coarser than espresso gives you the right consistency.
Percolators call for medium to medium-coarse grounds, closer to what you would use in a drip machine.
The basket in a percolator has larger holes than a moka pot filter, so fine grounds slip through and leave gritty sediment in your cup.
Coarser grounds stay in the basket and withstand multiple passes of boiling water without turning harsh.
Quick Tip If you own a moka pot and a percolator, label two grind settings on your grinder so you never accidentally swap them. Fine grounds in a percolator create mud in your cup; coarse grounds in a moka pot produce bland, under-extracted coffee.
How Many Cups Can You Brew at Once?
Moka pots come in sizes ranging from one to twelve cups, but each “cup” measures about 50 milliliters, roughly the size of a single espresso shot.
A three-cup moka pot yields about 150 milliliters of concentrated coffee, enough for one strong American-style mug when diluted with hot water.
A six-cup model, the most popular household size, gives you about 300 milliliters.
Larger nine-cup and twelve-cup moka pots exist, but they take longer to brew and require more precise heat control to avoid scorching.
Percolators start where moka pots leave off.
A small stovetop percolator brews four standard 8-ounce cups, and larger models handle eight to twelve cups per batch.
Electric percolators can brew continuously, keeping coffee warm on a low heating element for hours.
That keep-warm feature makes electric percolators popular in offices and family kitchens where people refill throughout the morning.
For a single person or a couple who want intensity over volume, the moka pot makes sense.
For a household of four or a weekend gathering, the percolator saves you from running three or four moka pot cycles back to back.
Running multiple moka pot batches in a row heats the aluminum body unevenly, which can push later cycles into over-extraction.
One percolator batch replaces that hassle entirely.
Quick Tip If you regularly brew for more than three people, skip the moka pot math and go straight to a percolator. A six-cup moka pot still only makes about two regular mugs of coffee.
Which Brewer Is Easier to Use?
The moka pot asks for more attention: you fill the lower chamber to the safety valve, load fine grounds without tamping, and pull it off the heat the moment it starts sputtering.
Miss that sputtering window by thirty seconds, and the coffee picks up a burnt, metallic edge.
A percolator forgives more mistakes, since you simply add water and coarse grounds, set it on any heat source, and wait for bubbling through the glass knob.
Over-extraction is the main risk, but you fix that by shortening the brew time next round.
For beginners, the percolator is the gentler learning curve, and the moka pot rewards precision with better-tasting coffee.
Either brewer takes less than a week of daily use to feel second nature.
Moka Pot vs Percolator Pressure and Brew Temperature
A moka pot generates between 1 and 2 bars of pressure during extraction.
That is enough to force water through a tightly packed bed of fine grounds and produce concentrated coffee, but it falls far short of the 9 bars required for true espresso.
The brew temperature sits near or at boiling, around 100°C, which is higher than the 90 to 96°C range used by commercial espresso machines.
A percolator generates almost no pressure at all.
Gravity and the natural convection of boiling water do all the work, cycling liquid through the grounds at a full 100°C boil.
That high temperature extracts quickly and aggressively, which is why percolator coffee trends toward bitterness if you do not watch the clock.
The moka pot’s modest pressure gives it a thicker mouthfeel and a texture you can feel coating your tongue, something a percolator cannot replicate.
Wikipedia notes moka pot coffee contains roughly 3 to 4% dissolved solids, compared to about 2% for drip and 9 to 10% for espresso, placing it squarely between the two.
| Spec | Moka Pot | Percolator |
|---|---|---|
| Brew pressure | 1 to 2 bars | Near zero (gravity driven) |
| Brew temperature | ~100°C | ~100°C (full boil) |
| Extraction style | Single upward pass | Repeated cycling |
| Brew time | 4 to 6 minutes | 7 to 10 minutes |
| Dissolved solids | ~3 to 4% | ~1.5 to 2% |
Cleaning and Maintaining Each Brewer
After each use, a moka pot should be disassembled into its three parts, rinsed with warm water, and left to air dry.
Skip the dish soap on aluminum models, since detergent strips the thin layer of coffee oil that seasons the pot and protects the metal.
Every two to three months, check the rubber gasket for cracks or stiffness and replace it if it no longer seals tightly.
A worn gasket lets steam escape sideways, dropping brew pressure and producing weak coffee.
Replace the gasket immediately if you notice steam hissing from the seam during brewing.
Percolators have fewer parts to worry about.
Rinse the pot body, the central tube, and the basket after each brew.
Stainless steel percolators can handle mild dish soap without any seasoning concerns.
Percolators have no gaskets or rubber seals to replace, which means lower long-term maintenance costs and fewer replacement parts to track down.
A percolator you buy today can function identically in twenty years with nothing more than regular rinsing.
Signs your moka pot needs maintenance:
- Steam leaking from the middle seam during brewing
- A metallic or rubbery taste in the finished coffee
- The filter screen looks clogged or discolored
- Coffee takes noticeably longer to rise into the upper chamber
Moka Pot vs Percolator for Camping and Travel
Moka pots weigh less and pack smaller, making them the stronger pick for solo backpacking or lightweight camp setups.
A three-cup aluminum moka pot weighs under 350 grams and fits inside a packed mug or cook pot.
It works on propane stoves, gas burners, and carefully managed campfire grates.
The downside is volume: you get one small batch per brew, and running multiple cycles over a camp stove burns through fuel.
Stainless steel moka pots add durability for rougher trips but weigh about twice as much as aluminum versions.
Percolators earn their place at group campsites and car camping trips.
A stovetop percolator brewing eight cups of coffee over a campfire can keep a group of five or six caffeinated all morning without constant refilling.
The brew process requires almost no supervision beyond an occasional glance at the glass knob.
Coarse grounds are easier to prepare at a campsite, too, since you can hand-grind them in a portable mill without chasing a precise fine setting.
Percolators sit more stably on uneven campfire grates than a small moka pot, which can tip if the base is not level.
The larger body absorbs bumps and temperature swings from open flame better than the thinner walls of a moka pot.
Do:
- Bring pre-ground coffee if you want to save weight and skip the portable grinder
- Preheat water over the fire before adding it to a moka pot to shorten brew time and reduce scorching
- Use a bandana or cloth to grip hot metal handles on either brewer
Don’t:
- Place a small moka pot directly on an unstable campfire grate without a trivet or flat stone underneath
- Let a percolator boil on a campfire for more than ten minutes, since the open flame pushes extraction speed higher than a kitchen stove
- Forget to rinse either brewer before packing it away, since old grounds attract ants and develop mold overnight
Beginner Note For a solo or two-person camping trip, pack a moka pot. For groups of four or more, a percolator saves time, fuel, and the frustration of brewing six tiny batches in a row.
How Moka Pot and Percolator Prices Compare
A classic aluminum moka pot from Bialetti costs between $25 and $45, depending on size, and stainless steel models for induction cooktops run $30 to $60.
The only recurring cost is a replacement gasket and filter set every six to twelve months, usually around $5 to $8.
Stovetop percolators fall in a similar range, from $20 to $50 for stainless steel models.
Electric percolators with auto-shutoff and keep-warm plates cost more, landing between $40 and $90.
Percolators have no gaskets to replace, so the lifetime cost after purchase is essentially zero beyond coffee and water.
Over five years, the total cost of ownership is close for stovetop models of either brewer, with the moka pot adding only a few dollars per year in gasket replacements.
Durability: Which Coffee Maker Lasts Longer?
Aluminum moka pots can last a decade or more with proper care, though the octagonal body can dent if dropped on a hard surface.
A dent on the bottom chamber can create an uneven seal, letting steam escape and weakening the brew.
Stainless steel moka pots resist dents and corrosion better, but they cost more upfront and heat less evenly on gas burners.
The weakest link in any moka pot is the rubber gasket, not the body itself.
Over time, that gasket hardens, and you can feel it lose flexibility by pressing it between your fingers: fresh gaskets bounce back, old ones stay flat.
A stiff gasket lets steam hiss sideways during brewing, and you will hear a faint whistling that was not there when the pot was new.
Replacing it takes about thirty seconds and costs less than $8.
Stainless steel percolators are built like tanks.
The thick walls, simple tube construction, and absence of rubber seals mean there is very little that can break or wear out.
Camping percolators from brands like GSI Outdoors or Stanley routinely survive years of rough outdoor use without losing function.
Some families pass percolators through two or three generations without a single repair.
The glass knob on top is the most fragile part, and even that rarely breaks under normal use.
If you want a brewer you can hand down to someone else with zero maintenance history to explain, the percolator has the edge.
A moka pot lasts just as long if you stay on top of gasket swaps, but that small chore is one more thing to track.
Signs your percolator may need attention:
- Coffee grounds appear in the finished brew (basket holes may be worn)
- The glass knob is cracked or fogged permanently
- Water leaks from the base when heated
- The tube wobbles or does not sit straight in the chamber
Which Coffee Brewer Should You Choose?
Pick the moka pot if you like concentrated, espresso-style coffee with layered flavor, if you drink one to two cups at a time, and if you enjoy the hands-on ritual of stovetop brewing.
Pick the percolator if you want large batches of bold, straightforward coffee with minimal effort, if you regularly serve more than two people, or if you need a brewer that works reliably over a campfire with no replacement parts to remember.
You can own one of each without much shelf space or budget strain, and a moka pot on a Tuesday morning paired with a percolator on a Saturday camping trip covers a wide range of coffee situations without compromise.
The best brewer is the one that matches how you actually drink coffee, not the one with the longest feature list.