That craving for a thick, dark shot of coffee usually sends people shopping for a $400 machine.
A Moka pot does most of the work for under $40 and lives quietly on the back of any stove.
The brew it produces is not technically espresso, but it gets close enough that most coffee drinkers can hardly tell the difference once milk goes in.
Below is the full method, from grind to first sip, plus the small fixes that turn a mediocre cup into something you’d happily serve a guest.
How the Moka Pot Brews Like an Espresso Maker
Italian engineer Alfonso Bialetti invented the Moka pot in 1933, and the eight-sided aluminum design has barely changed since.
It uses steam pressure from a sealed lower chamber to push hot water up through a basket of coffee grounds and into the upper chamber.
The pressure sits around 1 to 2 bars, well below the 9 bars an espresso machine produces, which is why coffee snobs call the result stovetop espresso rather than true espresso.
Why Use a Moka Pot Instead of a Big Machine
A 6-cup Moka pot costs around $30 and takes up less counter space than a toaster.
It needs no electricity, no descaling tablets, no milk wands to scrub, and no $5 paper filters.
The coffee it makes runs roughly 100 to 130 mg of caffeine per 2-ounce serving, putting it close to a real espresso shot and stronger per ounce than drip.
You can take one camping, set it on a hotel induction burner with the right base, or pack it into a kitchen drawer when guests come over.
What You Need to Get Started
The gear list is short and most of it is already in your kitchen.
Pick up the few pieces below and you’re set for years.
- A Moka pot sized to how much coffee you actually drink, since the pot only brews well when filled close to capacity (a 3-cup makes about one large mug).
- Fresh whole bean coffee in a dark or medium-dark roast, with Italian brands like Lavazza, Illy, and Kimbo all working nicely.
- A burr grinder, since blade grinders make uneven grounds that channel and over-extract.
- Filtered water, since tap water with heavy minerals will dull the flavor and scale the pot over time.
- A small ceramic demitasse cup or two, warmed under hot tap water before pouring.
Picking Your Beans and Grind
Dark and medium-dark roasts handle the Moka pot’s longer brew time best, lighter roasts often come out sour or thin.
Buy whole beans roasted within the last few weeks and grind them right before brewing.
The target grind sits between drip and espresso, think the texture of fine table salt or beach sand.
Too fine and the water cannot push through, building dangerous pressure and a bitter, burnt cup.
Too coarse and the water races through, giving a weak, watery shot with no body.
A burr grinder set one or two clicks coarser than your standard espresso setting hits the right spot for most pots.
Brewing Espresso in a Moka Pot, Step by Step
The method below makes a roughly 4-ounce serving in a 3-cup pot and takes about five minutes from cold start to first pour.
Boil your kettle first, since pre-heating with hot water shortens the time on the burner and protects the beans from cooking before extraction.
Keep the lid open through the brew so you can watch the stream change color.
Cut the heat the instant you hear the first hiss of steam, never wait for the loud sputter most articles tell you to expect.
A damp towel wrapped around the base stops residual heat from scorching the last drops.
1. Pre-Heat the Base With Hot Water
Pour just-off-the-boil water into the bottom chamber, stopping just below the safety valve.
The line is there for a reason, water above it can block the valve and turn the pot into a small steam bomb.
Hot water in the base means the coffee grounds spend less time roasting on the stove, which keeps bitterness out.
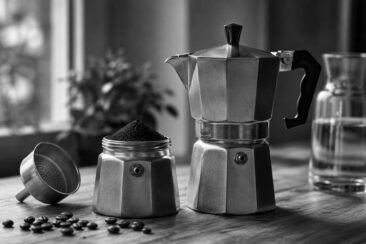
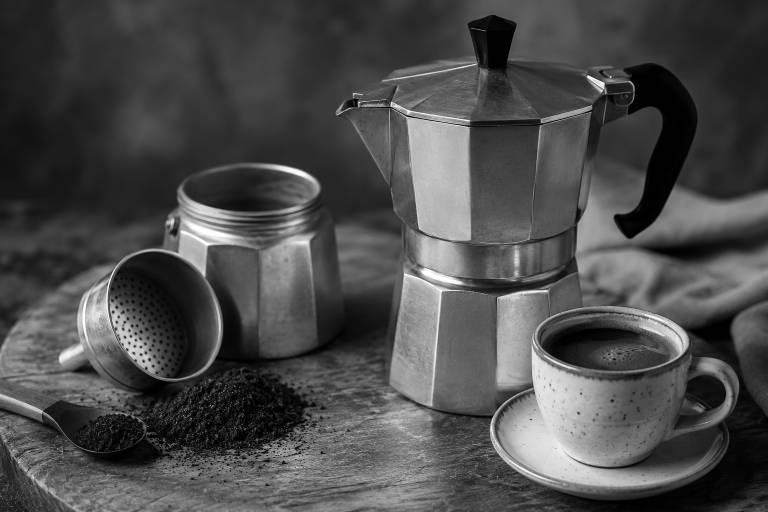
2. Fill the Basket Without Tamping
Spoon the grind into the funnel-shaped basket until it sits flush with the rim, then level it with a finger.
Skip the tamper, packing the grounds blocks the water and almost guarantees a burnt, over-extracted cup.
For a 3-cup pot, around 17 to 20 grams of coffee is the sweet spot.
3. Screw the Pot Together Quickly
Use a folded towel to grip the hot base and twist the top on tight enough to seal.
Check that the rubber gasket sits flat and the metal filter underneath looks clean, since a torn gasket leaks pressure and a clogged filter chokes the brew.
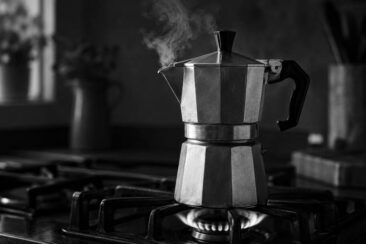
4. Brew on Medium-Low Heat
Set the pot on a burner sized close to the base of the pot, with the flame turned to medium-low.
A blast of high heat looks faster but burns the coffee and produces a metallic, sharp taste.
In two to four minutes you’ll hear a soft gurgle and see honey-colored coffee rising into the top chamber.
5. Pull It Off the Moment You Hear Hissing
The first wisp of steam means the water in the base is gone and the pot will start pulling air through the grounds, which tastes terrible.
Move the pot off the burner right away and wrap the base in a cool damp towel to stop the brew.
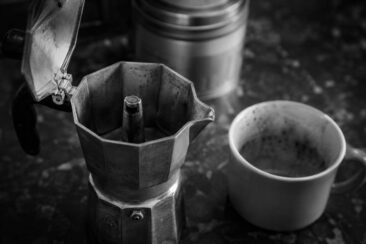
Give the pot a gentle stir with a spoon, then pour into warmed cups.
Fixing the Most Common Moka Pot Problems
Most bad Moka pot shots come from one of a handful of easy mistakes, and each has a clear fix.
Bitter and burnt usually means the heat was too high or the grind was too fine, so drop the burner to low and bump the grind one notch coarser.
Sour or sharp points to under-extraction from a grind that was too coarse or water that left the kettle below boiling, a finer grind and hotter starting water will fix it.
Weak and watery is the most common complaint, and it almost always traces back to an under-filled basket or a pot that wasn’t filled close to its rated capacity.
Metallic or chemical flavors come from new aluminum pots that have not been seasoned yet, brew and discard three or four pots of cheap coffee before serving any from a fresh one.
A thin, washed-out crema layer is normal for a Moka pot, the 1 to 2 bars of pressure cannot produce the thick foam an espresso machine does no matter what you try.
Burning your fingers on the handle means the burner is wider than the base, shrink the flame to match the pot’s footprint and the handle stays cool.
Cleaning and Caring for Your Pot
Rinse the pot with hot water after every brew and let it air dry upside down so no moisture sits in the seams.
Skip dish soap on an aluminum pot, the metal absorbs flavors from detergent and your next coffee will taste of soap for weeks.
Stainless steel pots can handle a light dish soap if you really want it, but plain hot water still does the job.
Check the rubber gasket every month for cracks or stiffness, a worn gasket is the top reason a Moka pot stops sealing properly.
Replacement gaskets cost a few dollars and the filter plate under the gasket should be swapped at the same time.
Limescale builds up in the lower chamber over time, especially in hard-water areas, a quick soak with a 50/50 mix of water and white vinegar clears it out.
Never put a Moka pot in the dishwasher, the heat and detergent strip the inside lining and dull the metal in a few cycles.
A well-kept pot lasts decades, plenty of Italian families still brew on the same Bialetti they bought in the 1970s.
Final Thoughts
A Moka pot rewards two small habits, fresh beans and patience with the flame, and the cup that lands in your demitasse will rival most café shots for a fraction of the cost.