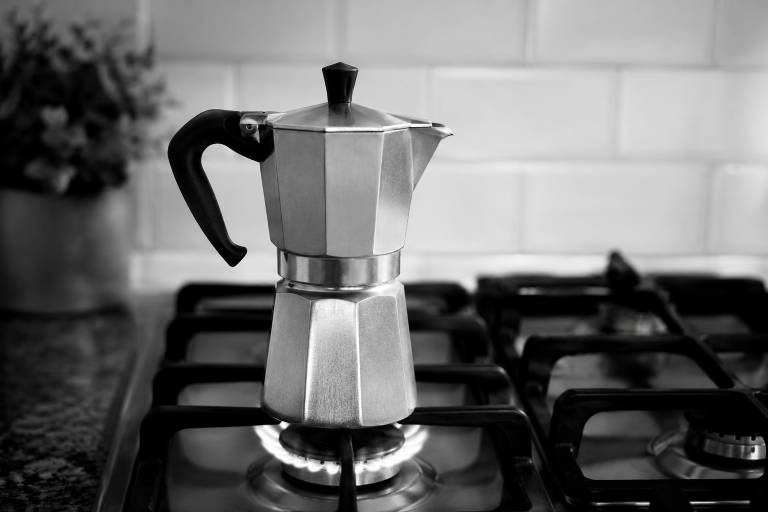
A moka pot on a gas stove produces some of the richest, most full-bodied coffee you can make at home for under $30.
The open flame gives you instant heat control that electric and induction cooktops struggle to match.
Getting the best cup from this setup takes a few specific adjustments to grind size, flame level, water temperature, and timing.
This guide covers every step from filling the bottom chamber to pulling the pot off the burner at exactly the right moment.
Quick Answer
Fill the bottom chamber with hot water to just below the safety valve, add medium-fine grounds to the filter basket without pressing them down, and place the moka pot on a low-to-medium gas flame that stays inside the base of the pot.
Remove the pot from heat as soon as the coffee stream turns pale and you hear the first sputter, then run cold water over the bottom to stop extraction.
Read on for specific grind sizes, ratios by pot size, flame control techniques, and troubleshooting fixes.
Can You Use a Moka Pot on a Gas Stove?
A gas stove is one of the best heat sources for a moka pot.
The original Bialetti Moka Express was designed in 1933 for Italian gas stovetops, and the pairing still works just as well today.
Aluminum and stainless steel moka pots are compatible with open-flame gas burners.
Stainless steel models handle direct flame better over time, with less risk of surface discoloration from repeated heat exposure.
Aluminum pots heat faster and cost less, but their softer metal can show scorch marks if the flame extends past the base.
Quick Tip If you are using a moka pot for the first time, run 2 to 3 brew cycles with water only (or water and discarded coffee) before making your first drinkable cup.
Why Gas Stoves Are Ideal for Moka Pot Brewing
Gas burners respond the instant you turn the dial.
That matters for moka pot brewing, where you need to drop heat quickly once coffee starts flowing into the upper chamber.
Electric coils and glass-top stoves hold residual heat for minutes after adjustment, which can push the brew past the sweet spot and into bitter, over-extracted territory.
A gas flame wraps around the base of the pot, heating the water chamber from the bottom and sides at the same time.
This creates more even pressure buildup than a flat electric element that only contacts the very bottom.
| Feature | Gas Stove | Electric Coil | Induction |
|---|---|---|---|
| Heat response time | Instant | 30-60 seconds | Instant |
| Temperature precision | High | Low | High |
| Works with aluminum pots | Yes | Yes | No (needs adapter) |
| Works with stainless steel pots | Yes | Yes | Yes |
| Flame/heat visibility | Visible flame | No visual cue | No visual cue |
| Residual heat after shutoff | None | High | None |
The visible flame on a gas stove gives you one more advantage: you can see exactly how large the heat source is relative to the pot.
How to Use a Moka Pot on a Gas Stove Step by Step
Follow this sequence for a clean, balanced brew every time.
Boil your water first. Heat water in a kettle to a full boil, then let it cool for about 30 seconds before pouring it into the bottom chamber.
Pre-heated water shortens the time the pot sits on the burner, which prevents the grounds from cooking before the brew even starts.
Fill the bottom chamber to just below the safety valve. The small metal valve on the inside wall marks the maximum fill line.
Going above it blocks the pressure release and can cause leaks or dangerous pressure buildup.
Add coffee grounds to the filter basket. Use a moka pot grinder to get a consistent medium-fine grind, then fill the basket to the rim.
Level the grounds with your finger or a flat edge, but do not tamp or press them down.
Tamping creates too much resistance for the 1 to 2 bars of pressure a moka pot generates, which leads to channeling, uneven extraction, or a stalled brew.
Common Mistake Packing the grounds tightly is the most frequent error new moka pot users make. A moka pot is not an espresso machine. The basket should be full and level, never compressed.
Assemble the pot tightly. Use a towel or oven mitt to grip the hot bottom chamber (you just filled it with near-boiling water) and screw the upper section on firmly.
A loose seal lets steam escape from the threads instead of pushing through the grounds.
Place the moka pot on a small gas burner. Choose a burner where the flame stays within the footprint of the pot’s base.
If the flame licks up the sides, it heats the upper chamber directly, scorches the handle, and can give the coffee a burnt taste before it even finishes brewing.
Set the flame to low or medium-low. The brew should take roughly 4 to 6 minutes from the moment the pot hits the burner.
If coffee appears in the upper chamber within 2 minutes, your heat is too high.
Keep the lid open so you can watch the brew. Dark, honey-colored coffee will start rising through the center spout after a few minutes.
That early stream is the best-tasting portion of the entire brew.
Remove the pot from heat at the first sign of sputtering. Once the stream turns from dark brown to a pale, foamy yellow and you hear a hissing gurgle, the brew is done.
Run cold water over the bottom chamber immediately. Hold the base under a cold tap for 3 to 5 seconds to stop extraction and cool the remaining steam pressure.
This final step prevents the last bit of water from pushing through as bitter, over-extracted liquid.
Your moka pot is ready to pour.
Serve the coffee right away, straight or diluted with hot water for an Americano-style drink.
What Grind Size Works Best for Gas Stove Moka Pots?
The right moka pot grind size sits between espresso-fine and drip-coarse.
Aim for a texture similar to granulated sugar or fine sand.
Too fine, and the water can’t push through the grounds at 1 to 2 bars of pressure, which clogs the filter screen and produces a bitter, harsh cup.
Too coarse, and water rushes through with almost no resistance, leaving you with thin, sour, under-extracted coffee.
| Grind Size | Texture Comparison | Moka Pot Result |
|---|---|---|
| Espresso-fine | Powdered sugar | Clogged filter, bitter or no flow |
| Medium-fine (target) | Granulated sugar or fine sand | Balanced, full-bodied, smooth |
| Medium | Table salt | Slightly weak, acceptable |
| Coarse | Sea salt | Watery, sour, under-extracted |
A burr grinder produces the most consistent particle size for moka pot brewing.
Blade grinders create a mix of fine dust and large chunks, which means some grounds over-extract (bitterness) and some under-extract (sourness) in the same cup.
Freshly ground medium to dark roast beans give the boldest, smoothest flavor from a moka pot on gas.
Light roasts are denser and more acidic, which can taste sharp or sour at the lower pressure and shorter extraction time a moka pot provides.
How to Get the Right Water-to-Coffee Ratio
Most moka pots are pre-designed for a coffee-to-water ratio close to 1:10 by weight.
That means 1 gram of coffee for every 10 grams of water.
Filling the basket level to the rim and the water chamber to just below the safety valve gets you to that ratio without needing a scale.
| Moka Pot Size | Coffee (grams) | Water (grams/ml) | Brewed Output |
|---|---|---|---|
| 1-cup | 7-8 g | 60 ml | ~1 oz (single shot) |
| 3-cup | 15-17 g | 150 ml | ~3 oz |
| 6-cup | 25-30 g | 300 ml | ~6 oz |
| 9-cup | 35-40 g | 450 ml | ~9 oz |
The brewed coffee comes out about 2 to 3 times stronger than drip coffee.
Drink it straight for an espresso-style experience, or add hot water to taste for something closer to a full mug.
If your brew tastes too weak and you want it stronger, try a slightly finer grind before reducing water, since changing the water level throws off the pressure balance inside the pot.
How to Control Heat and Timing on a Gas Stove
Heat control is the single biggest factor separating good moka pot coffee from bitter, burnt moka pot coffee.
Start at low to medium-low flame. On most gas stoves, this is about 30% to 40% of full output.
The flame should be a small, steady blue cone that fits entirely underneath the pot without touching the sides.
A brew that finishes in under 3 minutes ran too hot. The water pushed through the grounds too fast, under-extracting the coffee and leaving it thin and sour.
A brew that takes longer than 7 minutes ran too cold. The grounds sat in contact with hot steam for too long, pulling out bitter compounds and producing a harsh, smoky taste.
The sweet spot for a 3-cup pot on gas is about 4 to 5 minutes from burner on to first sputter.
A 6-cup pot takes closer to 5 to 6 minutes.
Quick Tip Keep a kitchen timer running the first few times you brew. Once you know your stove’s ideal dial position for your specific pot, the process becomes automatic.
Reduce the flame slightly once you see the first dark drops of coffee rising into the upper chamber.
That small adjustment slows the flow rate and pulls more sweetness from the grounds without crossing into over-extraction.
Pull the pot off the heat completely when the stream turns pale, foamy, or starts to sputter.
How to Troubleshoot Moka Pot Problems on a Gas Stove
Most moka pot problems come down to grind size, heat level, or assembly.
Bitter or burnt-tasting coffee:
- Flame was too high
- Grind was too fine
- Pot stayed on heat past the sputtering stage
- Fix: lower the flame, coarsen the grind one notch, remove from heat earlier
Weak, watery, or sour coffee:
- Grind was too coarse
- Water was not hot enough at the start
- Brew ran too fast (under 3 minutes)
- Fix: go finer on the grind, pre-heat the water, reduce flame to slow the brew
Coffee sputters and sprays violently:
- Too much heat near the end of the brew
- The pot was left on the burner too long after finishing
- Fix: remove from heat at the first gentle sputter, run cold water on the base
No coffee comes out at all:
- Grind is packed too tightly (tamped)
- Filter screen is clogged with old coffee oils
- Gasket is worn, cracked, or missing
- Fix: level the grounds without pressing, deep-clean the filter, replace the gasket
Coffee leaks from the sides of the pot:
- Upper and lower chambers are not screwed together tightly
- Gasket is damaged or seated incorrectly
- Grounds are on the rim of the basket, breaking the seal
- Fix: wipe the basket rim clean, check the gasket, tighten the seal firmly
How to Clean and Maintain Your Moka Pot
Rinse every part of the moka pot with warm water after each use.
Disassemble the upper chamber, filter basket, and rubber gasket so no wet grounds sit trapped between parts.
A soft cloth or sponge removes coffee oils from the filter screen and inside walls.
Skip the dish soap on aluminum pots. Soap strips the thin layer of coffee oils that seasons aluminum, and it can leave a soapy aftertaste in your next brew.
Stainless steel pots tolerate mild soap without flavor issues.
Dry every piece completely before reassembling or storing.
Trapped moisture between the gasket and the chamber leads to mold growth or a musty smell in your next cup.
Check these parts once a month:
- Gasket: replace it if the rubber looks cracked, flattened, stiff, or no longer creates a tight seal
- Filter screen: hold it up to light and confirm the tiny holes are clear, not blocked by compacted coffee residue
- Safety valve: press it gently to confirm it still moves freely, then clear any buildup with a toothpick or thin pin
When to Replace If your moka pot shows deep pitting on the interior walls, a persistent metallic taste that cleaning does not fix, or a safety valve that no longer moves, replace the pot rather than continuing to brew with it.
For mineral deposits or white scaling, fill the bottom chamber with a 50/50 mix of water and distilled white vinegar, let it sit for 30 minutes, then rinse thoroughly.
Store the pot disassembled in a dry cabinet with the gasket resting loosely (not compressed) to extend its life.
Gas Stove Safety Tips for Moka Pot Brewing
Keep the flame inside the base of the pot. A flame that climbs the sides heats the handle, damages the upper chamber, and creates a burn risk when you grab the pot.
Point the handle away from the burner. Bakelite and plastic handles soften or melt under direct flame exposure.
Never leave a brewing moka pot unattended. The entire process takes 4 to 6 minutes, and walking away risks a dry pot on an open flame once all the water has pushed through.
Use an oven mitt or towel to handle the pot after brewing. Every metal surface, including the handle base, is hot enough to burn skin on contact.
Place the finished pot on a trivet or wooden board, not directly on a cold countertop, which can crack stone surfaces from thermal shock.
Make Gas Stove Moka Pot Brewing Your Daily Routine
A moka pot and a gas stove together produce a cup of coffee that sits somewhere between drip and espresso, with a thick body, concentrated flavor, and a smooth crema-like layer on top.
The entire process from kettle to pour takes about 7 minutes once you have your grind dialed in.
Stick with medium-fine grounds, pre-heated water, a low flame that fits under the base, and a quick pull from heat at the first sputter.
Those four details separate a rich, sweet brew from a bitter one.