That fuzzy green ring inside your Bialetti’s filter basket is not seasoning, and it is not a harmless coffee stain.
Moka pot mold grows fast, tastes terrible, and can send allergy-prone coffee drinkers into a sneezing fit before their first sip.
The good news: removing it takes about ten minutes with ingredients you already have in your kitchen.
This guide walks you through spotting mold, cleaning it safely, and making sure it never comes back.
What Causes Moka Pot Mold
Mold spores are everywhere in your kitchen, floating in the air and waiting for the right surface to land on.
A Moka pot after brewing creates exactly the conditions those spores need: warmth, moisture, and leftover coffee oils.
Coffee grounds trapped in the filter basket or stuck around the rubber gasket act as food for mold colonies.
Reassembling the pot before all the parts have dried seals that moisture inside, turning the lower chamber into a miniature greenhouse.
Pots that sit idle for a week or longer without being rinsed face the highest risk, since stale water and residue go undisturbed.
Hard water compounds the problem by leaving mineral deposits that create tiny porous surfaces where spores can anchor and spread.
How to Spot Mold in Your Moka Pot
The most obvious sign is visible fuzz: white, green, or black patches on the gasket, the inside of the filter basket, or along the walls of the lower chamber.
A musty, damp smell when you unscrew the pot is another strong clue, especially if the pot has been sitting unused.
Your coffee itself will tell you something is wrong, too, producing an earthy or stale off-flavor that no amount of fresh beans can fix.
Wipe any suspicious spots with warm water and a soft cloth to test them: if they come off easily with no scrubbing, you are likely looking at simple coffee residue.
Spots that resist a gentle wipe, or that reappear within a day or two of cleaning, are almost certainly mold and need a deeper cleaning treatment.
Mold vs. Oxidation vs. Limescale in a Moka Pot
Not every dark spot or white patch inside your Moka pot is mold, and knowing the difference saves you from unnecessary panic or the wrong cleaning method.
Oxidation shows up as dull gray or dark patches on aluminum Moka pots, caused by the metal reacting with oxygen and moisture over time.
These oxidation marks are cosmetic, not dangerous, and they will not affect how your coffee tastes.
Limescale looks nothing like mold: it appears as a chalky white crust inside the water chamber, built up from calcium and mineral deposits in hard tap water.
Limescale can restrict water flow and dull your brew’s flavor, but a simple descaling with a vinegar-water solution removes it.
Mold is the one you need to take seriously: it appears fuzzy or spongy, often in green, black, or white clusters, and carries a distinct damp smell that oxidation and limescale do not produce.
If you are unsure which type of stain you are dealing with, scrub the area with a vinegar-soaked cloth and watch how it responds: mold typically lifts with effort but returns without proper prevention, oxidation buffs away permanently, and limescale dissolves with acidic contact.
Health Risks of Brewing With a Moldy Moka Pot
Brewing coffee through a mold-contaminated pot means drinking water that has passed directly over active fungal colonies.
Regular exposure to certain mold varieties, including Aspergillus and Penicillium, can trigger allergic reactions, sinus congestion, and respiratory irritation.
People with asthma or weakened immune systems face greater sensitivity to these airborne and ingested spores.
Catching and cleaning mold early is far simpler than dealing with the headaches, coughing, or digestive discomfort it can cause over weeks of unnoticed exposure.
How to Clean Mold From Your Moka Pot
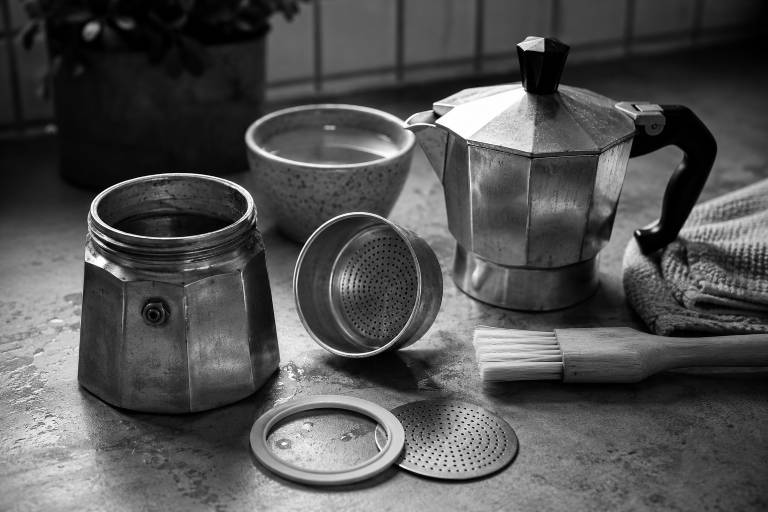
Start by fully disassembling the pot: unscrew the upper and lower chambers, remove the funnel, pull out the rubber gasket, and separate the filter plate.
Rinse every piece under hot running water to wash away loose coffee grounds and surface debris before applying any cleaning solution.
For a vinegar treatment, mix equal parts white distilled vinegar and warm water in a bowl, then submerge all the metal components and let them soak for 15 to 30 minutes.
After soaking, use a soft-bristled brush or an old toothbrush to scrub the gasket grooves, the inside of the funnel, and any crevices where mold likes to hide.
Rinse every component under clean running water until no vinegar smell remains.
For stubborn spots that vinegar alone cannot lift, make a paste from one tablespoon of baking soda and a few drops of water, apply it directly to the stain, wait five minutes, then scrub and rinse.
Dry each part completely with a clean towel before reassembling, paying special attention to the gasket and the threaded edges where water pools.
If the rubber gasket still smells musty or shows discoloration after a thorough scrubbing, it is time to replace it with a new one rather than risk recontamination.
Cleaning Differences for Aluminum and Stainless Steel
Aluminum Moka pots, like the classic Bialetti Moka Express, need gentler handling than their stainless steel counterparts.
Avoid using dish soap on aluminum, since detergent strips the thin layer of coffee oils that seasons the metal and protects it from producing a metallic taste.
A warm water rinse with a soft sponge is all an aluminum pot needs for daily cleaning.
When you do need to deep clean an aluminum pot, use a mild lemon juice solution (one teaspoon of lemon juice per 100 ml of warm water) rather than harsh chemical cleaners.
Stainless steel Moka pots are far less fussy: you can scrub them with dish soap, use stiffer brushes, and run a vinegar soak without worrying about damaging the surface.
Whichever material you own, never put your Moka pot in the dishwasher, since the high heat and aggressive detergents will degrade gaskets and corrode aluminum.
How Often to Deep Clean Your Moka Pot
A quick rinse and hand-dry after every brew is the daily minimum that keeps mold from getting a foothold.
Once a week, take the pot apart and wipe down each component with a damp cloth, checking the gasket and filter plate for any early signs of discoloration.
A full deep clean with vinegar or lemon juice should happen once a month if you brew daily, or every two weeks if your kitchen runs humid.
Descaling, which targets mineral buildup rather than mold, only needs to happen every two to three months, or whenever you notice white crusty deposits in the water chamber.
Keeping this schedule takes about five minutes per week and saves you from the much longer scrubbing session a neglected pot demands.
How to Prevent Moka Pot Mold From Growing Back
The single most effective prevention step is drying every component completely before putting the pot back together.
Leave the parts spread out on a clean dish towel for at least 30 minutes after washing, or wipe them down with a dry cloth if you are short on time.
Store the pot disassembled, or at the very least, leave the top chamber unscrewed so air can circulate inside.
Pick a storage spot that stays cool and dry: the inside of a closed, damp cabinet under the sink is the worst possible location for a Moka pot.
Switching from tap water to filtered or distilled water cuts down on mineral deposits that create the rough, porous surfaces mold spores cling to.
Empty the water reservoir after every use rather than letting leftover water sit overnight.
A monthly vinegar rinse, even when you see no visible mold, acts as a preventive treatment that kills dormant spores before they can colonize.
When to Replace Your Moka Pot or Its Parts
Rubber gaskets are the first components to wear out, and a cracked, warped, or permanently stained gasket is a breeding ground for mold that no amount of scrubbing will fix.
Plan on replacing your gasket every 6 to 12 months if you brew daily, or once a year for lighter use.
Filter plates that show pitting, warping, or persistent discoloration should be swapped out at the same time.
If the body of an aluminum pot has deep scratches, heavy corrosion, or rust on any steel components like the safety valve, the entire pot has reached the end of its usable life.
Stainless steel pots last much longer than aluminum ones, making them a better long-term investment for anyone who brews frequently.
Final Thoughts
Moka pot mold looks alarming, but it is one of the easiest coffee equipment problems to solve with a bottle of vinegar and a toothbrush.
The real fix is not in the cleaning itself, but in the drying and storage habits you build after every brew.
A Moka pot that gets rinsed, dried, and stored open will give you years of rich, clean-tasting coffee with no funky surprises.
Spend five minutes on your pot today, and your morning cup will thank you for it tomorrow.