That little rubber ring inside your moka pot does more work than most people realize.
It seals the upper and lower chambers together, lets pressure build during brewing, and directs hot water up through the coffee grounds.
When it starts to fail, the signs show up in your cup: weak flavor, sputtering steam, and puddles of water around the base.
Swapping in a new moka pot gasket takes about five minutes, costs a few dollars, and brings your stovetop brewer back to full strength.
This guide covers the warning signs, the replacement timeline, the step-by-step swap, and how to pick the right gasket for your specific model.
Why Your Moka Pot Gasket Wears Out
Every time you brew, the gasket absorbs heat from the stovetop and pressure from the steam forcing water upward.
Rubber and silicone are durable, but they degrade under repeated thermal stress.
Over months of daily use, the material hardens, cracks along the edges, or flattens into a shape that no longer grips the chamber walls.
A failing seal means steam escapes through the seam instead of pushing water through the coffee grounds.
That escaped pressure shows up as a weak, under-extracted brew or as water leaking from the midsection of the pot.
Old gaskets can hold onto stale coffee oils and residue in the groove where they sit, and those deposits sometimes introduce off-flavors into your morning cup.
Bacterial buildup around a cracked or deteriorating gasket creates a food safety concern, too.
Replacing the gasket on a regular schedule removes all of these problems at once.
Signs It’s Time to Replace Your Moka Pot Gasket
A moka pot rarely fails all at once.
The first clue is usually a small hiss of steam escaping from the seam between the upper and lower chambers.
Leaking water around the joint during brewing is the clearest signal that the seal has weakened.
Coffee that tastes thin or watery, with none of the body you’re used to, points to lost pressure from a worn ring.
If screwing the two halves together feels unusually tight or you need extra force to close the pot, the gasket may be swollen or warped.
Look at the gasket itself when you unscrew the pot.
Cracks, tears, dark discoloration, or a stiff texture that no longer springs back when pressed are all visible red flags.
A rubbery or burnt taste in the coffee can come from a degraded gasket leaching material into the brew.
Any one of these signs is reason enough to swap the gasket out.
How Often to Replace a Moka Pot Gasket
Bialetti, the most recognized moka pot manufacturer, recommends changing the gasket at least once a year.
For daily brewers who run two or more pots per day, a 3 to 4 month cycle keeps the seal reliable.
Households that brew a few times a week can stretch the gasket closer to 6 to 9 months before wear becomes noticeable.
Occasional users, people who pull the moka pot out once or twice a month, may get a full year or more from a single gasket.
These timelines shift depending on stovetop heat, how tightly you screw the pot together, and the material of the gasket itself.
Silicone holds up longer under heat than traditional rubber, so it often pushes the replacement window further out.
The most reliable method is to inspect the gasket every few weeks and swap it at the first sign of stiffness or cracking rather than waiting for leaks to appear.
How to Replace the Moka Pot Gasket Step by Step
Gather a new gasket that matches your pot size, a butter knife or flat-head screwdriver, and a clean cloth.
A vinegar and water solution works well for removing oxidation from the metal surfaces before installing the new seal.
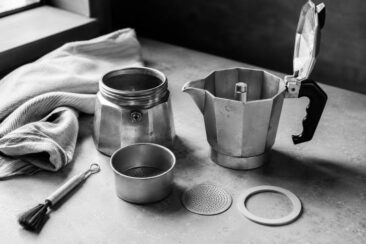
Disassemble the pot. Unscrew the upper chamber from the base and set the filter basket aside.
Remove the old gasket. Turn the upper chamber upside down so the gasket and filter plate face you.
Slide the butter knife or screwdriver under the gasket’s edge and gently pry it out of the groove.
If the gasket is stuck, run warm water over the chamber for 30 seconds to loosen it.
For Bialetti models with a knob on the lid, twist the knob counterclockwise and remove it first, which makes the upper chamber easier to handle.
Clean the groove. Wipe the channel where the gasket sat with a damp cloth.
Dark, oily residue builds up in this groove over time, and leaving it there will prevent the new gasket from seating flat.
Seat the new gasket. Press the new gasket evenly into the groove all the way around.
It should sit flush with no bulges or gaps.
If it feels loose, double-check that you have the correct size for your pot model.
Replace the filter plate. Set the metal filter plate on top of the gasket, making sure it sits flat against the rim.
A bent or clogged filter plate can undo the benefit of a fresh gasket, so replace it too if it looks warped or discolored.
Reassemble the pot. Screw the upper chamber back onto the base until you feel resistance, then give it about a quarter turn more.
Cranking it too tight compresses the new gasket and shortens its life.
Run a test brew. Fill the base with water up to the safety valve and run a cycle without coffee grounds.
This checks the seal, softens the new gasket, and flushes any manufacturing residue or faint rubber smell from the ring.
If you detect a strong rubber odor, boil the gasket in a half-water, half-vinegar mixture for ten minutes, then soak it for another twenty minutes in a fresh batch of the same solution.
Rubber vs Silicone Moka Pot Gaskets
Most moka pots ship with a rubber gasket from the factory.
Rubber forms a reliable seal and costs less per unit, making it the standard choice for manufacturers.
Its main weakness is durability: rubber hardens faster under heat, absorbs coffee oils, and develops a rubbery odor that can transfer into the brew.
Silicone gaskets resist heat better, last longer before cracking, and do not hold onto odors the way rubber does.
They cost slightly more, usually a dollar or two extra per gasket, but the longer lifespan often makes up for the price difference.
Silicone is the better pick for heavy daily use or for anyone who finds the rubber smell bothersome.
One tradeoff: new silicone gaskets can feel slightly stiffer at first and may need a brew or two before they fully conform to the groove.
Rubber remains a solid option for lighter, less frequent use where the gasket gets swapped out on a regular yearly cycle anyway.
How to Pick the Right Replacement Gasket Size
Moka pot gaskets are not interchangeable across models.
A 3-cup Bialetti gasket will not fit a 6-cup pot, and a generic “universal” gasket may leave small gaps that leak under pressure.
The safest approach is to buy a gasket made by the same brand as your pot, matched to the exact cup size printed on the bottom of the base.
Bialetti sells gasket-and-filter-plate kits sorted by cup capacity.
If the brand-specific option is unavailable, measure the old gasket before ordering.
Use a ruler or tape measure to capture the inner diameter and outer diameter in millimeters, then match those numbers to the product listing.
Online retailers that specialize in coffee accessories usually list gasket dimensions alongside the cup-size rating.
Buying a two-pack or three-pack at once keeps a spare on hand for the next swap and saves you from waiting on shipping when a gasket fails unexpectedly.
How to Make Your Moka Pot Gasket Last Longer
Proper care and regular maintenance extend the life of every component in your moka pot, and the gasket benefits the most.
After each brew, disassemble the pot once it cools and rinse all parts under warm water.
Dry every piece with a towel before putting the pot away, since moisture trapped around the gasket encourages mold and musty flavors.
Store the pot with the chambers separated rather than screwed together.
Leaving the pot assembled keeps the gasket under constant compression, which flattens the ring and reduces its ability to spring back into a tight seal.
On the stovetop, keep the flame at or below the diameter of the pot’s base.
High heat dries out rubber faster and shortens the gasket’s usable life by months.
Tighten the pot only until you feel resistance.
Over-tightening deforms the gasket, wears out the threading, and makes the next disassembly harder than it needs to be.
A quick visual inspection once a month catches early cracking or stiffness before it turns into a leak.
Common Problems After Replacing the Gasket
A brand-new gasket occasionally creates brewing issues that seem worse than the old one.
The most frequent complaint is continued leaking right after the swap.
This usually means the gasket size is slightly off or the ring is not seated evenly in the groove.
Remove the upper chamber, press the gasket firmly into place all the way around, and reassemble.
Weak or watery coffee after a replacement often points to a filter plate that isn’t sitting flat against the gasket.
Reassemble with the filter plate centered and flush.
Hissing from the safety valve does not always indicate a gasket problem.
A partially clogged valve releases steam irregularly, and cleaning it with a pin or toothpick usually fixes the noise.
New gaskets are stiffer than broken-in ones, which makes the first two or three brews less consistent.
Running a water-only cycle before your first real pot of coffee helps the gasket soften and mold to the groove.
If the pot is still sputtering after all of these checks, inspect the threading on the upper and lower chambers.
Worn or stripped threads prevent a tight seal regardless of how new the gasket is, and that problem calls for a new pot rather than another gasket.
Final Thoughts
A moka pot gasket is a small, inexpensive part that controls the entire brewing process.
Replacing it on a regular schedule, every 3 to 12 months depending on how often you brew, keeps leaks away and flavor strong.
Silicone lasts longer under heat, rubber costs less up front, and the right choice comes down to how often you use your pot.
Keep a spare gasket in the kitchen drawer so you never have to wait on a delivery when yours gives out.
Five minutes of maintenance keeps your moka pot producing rich, full-bodied coffee for years to come.