That chalky gray film coating the inside of your moka pot is not dirt, and it is not your imagination.
It is oxidation, a chemical reaction between aluminum and the air, and it changes the way your coffee tastes and smells.
The good news: a few pantry staples, 30 minutes, and the right technique can strip it away and keep it from coming back.
This guide breaks down what moka pot oxidation is, what it does to your brew, exactly how to clean it, and how to stop it from returning.
What Moka Pot Oxidation Actually Looks Like
Oxidation on a moka pot does not look like the reddish-brown flakes you see on a rusty garden tool.
That reddish color comes from iron oxide, which only forms on iron or steel surfaces.
Aluminum moka pots develop something different: a dull gray, dark black, or powdery white coating that clings to the metal rather than flaking off.
You will notice it first on the inside of the lower chamber and around the rim where the two halves screw together, since those areas trap the most moisture.
The texture ranges from a faint haze that dulls the original shine to a gritty, chalk-like buildup you can feel under your fingertip.
On stainless steel moka pots, oxidation is far less common, since chromium in the alloy creates a self-healing protective layer that resists corrosion.
If your stainless pot shows dark spots, those are almost always coffee oil residue or discoloration rather than true oxidation.
Recognizing the difference between aluminum oxidation, coffee stains, and mold matters, since each one calls for a different cleaning approach.
Why Your Moka Pot Oxidizes
Aluminum reacts with oxygen the moment its surface is exposed to air, forming a thin layer of aluminum oxide (Al₂O₃) that is normally invisible and protective.
Problems start when that protective layer gets stripped away or damaged, exposing fresh aluminum underneath to a new cycle of oxidation.
Harsh dish soap is the most common culprit, especially anything with citrus-scented degreasers or bleach compounds that eat through the oxide barrier.
Abrasive scrubbing with steel wool or stiff-bristled brushes scratches the surface, creating grooves where moisture collects and accelerates the reaction.
Running your moka pot through the dishwasher combines high heat, aggressive detergent, and prolonged water exposure into a single oxidation-triggering event, which is why Bialetti and most manufacturers explicitly warn against it.
Tap water loaded with chlorine and dissolved minerals can speed up the process from the inside, leaving deposits that interact with the aluminum.
Humid climates accelerate oxidation faster than dry ones, so a moka pot stored in a steamy kitchen near the stove or above a dishwasher vent faces constant invisible moisture exposure even when it appears dry to the touch.
Acidic coffee residue left on the filter plate and funnel walls eats into the aluminum in a similar way to vinegar, which is why Bialetti recommends rinsing every component under running water immediately after each brew rather than letting it sit.
Storing the pot with the chambers screwed together when it is still damp traps moisture against the metal for hours.
Infrequent use creates another risk: coffee oils left inside the pot turn rancid and acidic over weeks, eating into the aluminum surface and creating dark, pitted spots that look worse than standard oxidation.
Those combined factors explain why two identical Bialetti pots can age in completely different ways depending on how their owners wash, dry, reassemble, and store them.
How Oxidation Changes Your Coffee’s Flavor
A lightly oxidized moka pot brews coffee that tastes almost identical to one in perfect condition, so a faint gray haze on the walls is no reason to panic.
Once the oxidation deepens and becomes visibly dark or textured, the flavor shifts in ways you can taste with your first sip.
The most common change is a flat, metallic bitterness that sits on the back of your tongue and lingers after you swallow.
Rancid coffee oils trapped in oxidized pits produce a stale, cardboard-like undertone that masks the bright, fruity notes a moka pot should pull from fresh grounds.
Your nose picks up the difference before your mouth does: where a clean pot produces a sharp, roasted-cocoa aroma as coffee rises into the upper chamber, an oxidized one pushes out a muted, slightly acrid scent closer to overheated pennies.
A well-maintained moka pot can last decades, so it is worth investing 20 minutes in a deep clean rather than accepting a dull, metallic cup as normal.
The flavor difference between a cleaned and neglected pot will remind you why you picked stovetop brewing in the first place, and the cleaning process starts with a handful of ingredients you probably already own.
Is It Safe to Drink from an Oxidized Moka Pot?
The short answer is yes for the large majority of people, since aluminum oxide, the gray or black compound that forms on oxidized moka pots, is a stable, non-toxic substance that does not dissolve into your coffee under normal brewing conditions.
A 2017 peer-reviewed study published in the journal Metals measured aluminum migration from moka pots into coffee and found that an average weekly coffee intake of 3.17 liters contributed a maximum of 4% of the European Food Safety Authority’s tolerable weekly intake, even when the pots had been dishwasher-damaged.
The Alzheimer’s Association, the German Federal Institute for Risk Assessment (BfR), and Alzheimer’s Research UK have all stated that there is no conclusive scientific evidence linking aluminum cookware to Alzheimer’s disease, a position supported by research showing no increased rates among aluminum industry workers or dialysis patients with high aluminum exposure.
That said, heavy pitting, deep corrosion with visible metal flaking, or a persistently metallic taste after cleaning are signals to replace the pot rather than continue using it.
People with chronic kidney disease should consult their doctor about aluminum exposure, since impaired kidney function reduces the body’s ability to clear aluminum efficiently.
For everyone else, the science points to moka pot coffee being safe, and a quick clean is more about flavor than safety, which brings us to how to actually remove that oxidation.
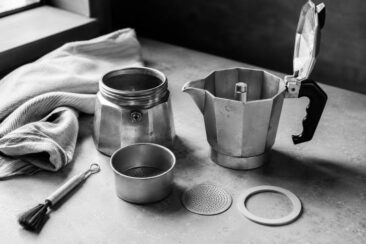
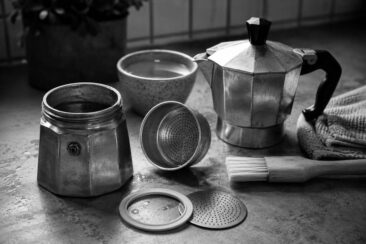
How to Clean an Oxidized Moka Pot
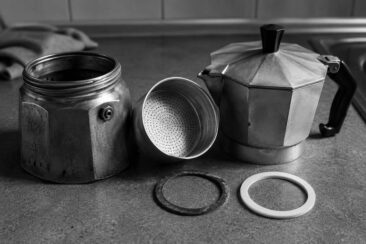
Before starting, disassemble your moka pot completely: unscrew the upper and lower chambers, remove the filter basket, pop out the rubber gasket, and separate the filter plate.
Cleaning each piece individually is the only way to reach the crevices where oxidation hides.
Rinse every component under warm running water first to remove loose coffee grounds and surface debris.
Here is a comparison of the most reliable cleaning methods, ranked from gentlest to most aggressive:
| Method | Ratio | Soak Time | Best For |
|---|---|---|---|
| White vinegar + warm water | 1:1 (equal parts) | 30 minutes | Light to moderate oxidation |
| Lemon juice + water | 1:3 (juice to water) | 30 minutes | Moderate oxidation, leaves a fresh citrus scent |
| Baking soda paste | 2 tbsp baking soda + enough water to form a thick paste | Apply and scrub, no soak needed | Stubborn dark spots on the exterior |
| Cream of tartar paste | 2 tbsp cream of tartar + water to paste consistency | Apply and scrub | Tarnished exterior, polishing |
| Citric acid solution | 1 tbsp citric acid powder per 500 ml water | 20-30 minutes | Heavy mineral buildup combined with oxidation |
For the vinegar soak, submerge all aluminum parts in the solution inside a bowl or container large enough to hold them flat.
After 30 minutes, scrub with a soft-bristled brush, such as an old toothbrush, using circular motions along the grain of the metal.
Stubborn spots may need a second soak, but resist the urge to switch to steel wool: scratching the surface only accelerates the next round of oxidation.
The baking soda paste works differently, relying on gentle abrasion rather than acid, so apply it with a damp microfiber cloth and rub in small circles until the dark patches lighten.
Rinse every piece under warm water until the surface feels smooth and no vinegar or paste residue remains, then dry each component immediately with a clean towel.
Skip the air-drying rack, since even 10 minutes of sitting wet can restart the oxidation cycle on freshly exposed aluminum.
If none of these household methods cut through the buildup, a commercial descaler like Urnex Dezcal or Bialetti’s own cleaning solution can handle extreme cases, but always check that the product is rated safe for aluminum before pouring it in.
Reassemble the pot only after every part is bone dry, and store the pieces separately with the chambers unscrewed so air circulates freely between them.
How to Prevent Moka Pot Oxidation
Prevention takes less effort than removal, and four habits cover the majority of what moka pot oxidation prevention requires.
Dry every component with a towel right after washing, and use only warm water with a soft cloth for daily cleaning, since the thin layer of coffee oil left behind acts as a natural barrier between the aluminum and the air.
Store the moka pot disassembled in a dry cabinet, never inside a closed drawer where humidity can build up or stacked under heavy items that might dent or scratch the surface.
Switch from tap water to filtered water for brewing, since even a simple charcoal pitcher filter cuts down on enough chlorine and mineral deposits to make a noticeable difference in how long your pot stays clean.
If you slip up and run the pot through the dishwasher by accident, inspect it immediately for new gray or black patches and treat them with a vinegar soak before they deepen, since 60 seconds of drying and proper storage after each brew eliminates the conditions oxidation needs to take hold.
How to Re-Season Your Moka Pot After Deep Cleaning
A deep vinegar scrub strips away moka pot oxidation, but it strips the protective coffee oil layer too.
Brewing your next cup in a freshly scoured pot will produce a thin, metallic-tasting coffee that might make you regret cleaning it at all.
Re-seasoning rebuilds that invisible oil coating in about 15 minutes using cheap coffee you are going to throw away.
Fill the lower chamber with filtered water to just below the safety valve line, load the filter basket with inexpensive pre-ground coffee, and assemble the pot.
Brew on medium heat and discard the entire pot of coffee once it finishes, since this first batch absorbs manufacturing residue and metallic flavors the way a sponge absorbs water.
Repeat the brew-and-discard cycle two more times, letting the pot cool for 5 minutes between rounds.
By the third batch, the inside walls carry a faint sheen of coffee oil that protects the aluminum and primes the pot for your next real cup.
Rinse the pot with warm water only after seasoning, with no soap of any kind, and dry it with a towel.
Your fourth brew is the one to drink, and the difference between a seasoned and unseasoned pot is the difference between a smooth, full-bodied cup and one that tastes like you licked a coin.
Oxidation vs. Mold vs. Limescale
Black or dark gray patches that are flush with the metal surface and cannot be wiped off with a cloth are oxidation.
Mold appears as fuzzy, raised spots that smear or brush away easily, carry a musty smell, and tend to grow wherever dried coffee grounds or moisture sit undisturbed for more than a few days.
If your moka pot smells sour or earthy when you open it, mold is the more likely culprit.
Limescale shows up as white, chalky deposits, usually on the inside of the lower chamber and around the safety valve, caused by calcium and magnesium in hard water crystallizing during repeated heating cycles.
Here is a quick reference for telling them apart:
| Symptom | Oxidation | Mold | Limescale |
|---|---|---|---|
| Color | Gray, black, or dull white | Black, green, or white (fuzzy) | White or chalky |
| Texture | Smooth, bonded to metal | Raised, smears when touched | Crusty, sometimes gritty |
| Smell | None | Musty or sour | None |
| Location | Anywhere aluminum is exposed | Filter basket, gasket, spout | Lower chamber, valve area |
| Removal | Vinegar soak or abrasive paste | Hot water + soap or vinegar, full disassembly | Citric acid or vinegar brew cycle |
Mold demands immediate full disassembly and thorough cleaning, including the rubber gasket, which is porous enough for mold to penetrate below the visible surface.
If you cannot fully remove mold from the gasket after scrubbing, replace it with a new one that matches your pot’s size.
Limescale does not affect safety, but heavy buildup restricts water flow through the filter and can slow your brew time by a minute or more, changing the extraction and making coffee taste over-extracted and bitter.
A single brew cycle using a mix of 1 part vinegar to 3 parts water, run through the pot without coffee grounds, dissolves light limescale.
Catching these problems early keeps you from guessing whether your off-tasting coffee is a grounds issue, a grind issue, or a pot issue, and that clarity leads to better cups faster.
When to Replace Your Moka Pot
Not every moka pot can be rescued by a deep clean, and knowing when to stop scrubbing saves you from brewing bad coffee in a pot where moka pot oxidation has done permanent damage.
Replace your moka pot if the aluminum is deeply pitted with visible craters you can catch a fingernail on, since those pits trap bacteria and coffee residue that no vinegar soak can reach.
A warped or bent base that wobbles on the stovetop creates uneven heat distribution, which causes the safety valve to trigger unpredictably or produces weak, under-extracted coffee from one side of the filter basket.
Stripped threads that prevent the upper and lower chambers from sealing tightly lead to steam escaping from the joint, and that lost pressure means your coffee dribbles out thin and watery rather than flowing with the syrupy concentration a moka pot should deliver.
Check the filter basket for cracks or holes larger than the factory perforations, since damaged baskets let coarse grounds pass into your cup and make gurgling and sputtering worse with each brew.
A safety valve clogged with mineral scale or corroded shut is a genuine hazard, not just a brewing inconvenience, and a pot with a non-functional valve should be retired immediately.
Cracked or permanently stiff gaskets cause leaking and should be replaced individually, but if the pot itself is corroded underneath the gasket seat, a new rubber ring will not fix the seal.
Gaskets and filter plates are inexpensive replacement parts, usually $5 to $8 for a set, so try swapping those first before discarding the entire pot.
Persistent discoloration that remains dark after two full vinegar-soak cycles usually means the oxidation has penetrated deeper than the surface layer, and no amount of scrubbing will restore clean-tasting brews.
A standard 3-cup Bialetti Moka Express costs roughly $25 to $35, which works out to less than the price of seven café lattes.
If you switch to a stainless steel model, you gain dishwasher compatibility and induction-stove support at a slightly higher upfront cost, around $30 to $50 for a comparable size.
The simplest test: brew one cup after a thorough cleaning, take a sip, and if you still taste metal or detect that flat, stale undertone, the pot has told you everything you need to know.
If your pot has served you for five or more years of daily use and the cleaning methods in this guide no longer restore its flavor, retiring it is the practical choice.
Final Thoughts
Moka pot oxidation looks alarming the first time you spot it, but it is a manageable problem with a straightforward fix.
Clean with vinegar or baking soda, re-season with a few throwaway brews, and prevent it from returning by drying and storing the pot properly after each use.
The real payoff is not a shinier pot sitting on your shelf.
It is a cleaner, sharper, more aromatic cup of coffee every morning, brewed in a pot that could easily outlast the next decade of your kitchen if you give it those few extra minutes of care.