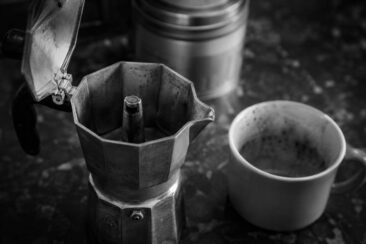
That sharp, acrid bite at the back of your throat is the unmistakable sign of burnt moka pot coffee.
The good news is that this problem almost always traces back to a handful of specific, fixable mistakes in your brewing routine.
Small adjustments to your heat, grind, ratio, and timing can transform a scorched, bitter cup into the rich, smooth espresso-style coffee the moka pot was designed to produce.
Quick Answer
Burnt moka pot coffee is usually caused by too much heat, a grind that’s too fine, or leaving the pot on the stove after brewing finishes. Lower your heat to medium-low, use a medium-fine grind, and remove the pot at the first sputter.
If your coffee still tastes harsh after those changes, the sections below cover every other cause, from dirty pots to overpacked baskets.
What Causes Burnt Taste in Moka Pot Coffee
A moka pot brews by heating water in the bottom chamber until steam pressure forces it upward through the coffee grounds and into the top chamber.
The entire process runs on about 1 to 2 bars of pressure, far less than the 9 bars in a standard espresso machine, which means the coffee bed sits over direct heat for the full brew cycle.
Burnt flavor shows up when the grounds get too hot for too long, pulling out harsh, ashy compounds that overpower the sweetness and body you want in the cup.
Any of the causes below, from cranked-up burners to stale oil residue on the filter plate, can push that extraction past the point where it starts to taste like charcoal instead of chocolate.
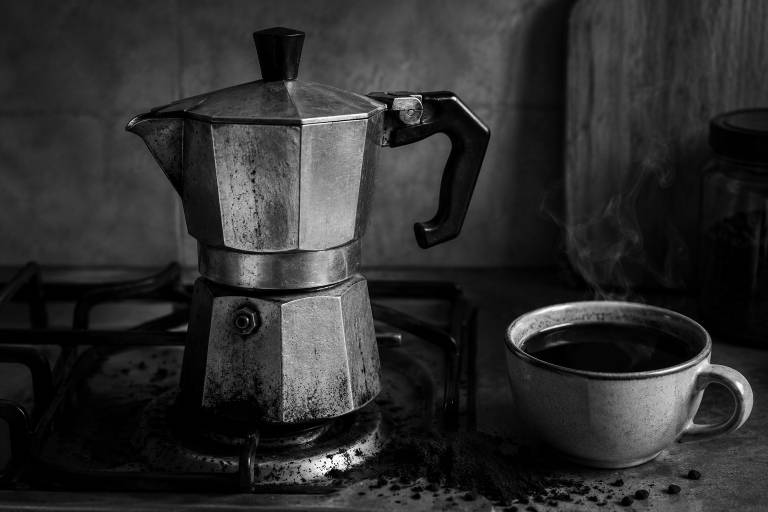
Too Much Heat Is the Biggest Moka Pot Mistake
Cranking the burner to high feels like a shortcut, but it is the single most common reason moka pot coffee tastes burnt.
High heat forces water through the grounds too aggressively, creating a brew that finishes in under three minutes and pulls out bitter, smoky compounds that should have stayed locked in the bean.
On a gas stove, the flame should be small enough that it heats only the base of the pot without licking up the sides.
Use medium-low heat from the start, then drop to the lowest setting once you hear the first quiet gurgle of coffee entering the upper chamber.
A well-paced moka pot brew takes roughly 4 to 7 minutes from stove to cup, depending on the size of the pot.
If yours finishes in two minutes, the heat is too high, and those scorched, metallic notes in the cup are the proof.
Preheating your water in a kettle before adding it to the bottom chamber is one of the most effective changes you can make, shortening the time the grounds sit over the burner before extraction actually begins.
Quick Tip If you’re using a gas stove and noticing a burnt rubber smell mixed in with the scorched coffee aroma, your flame is reaching the rubber gasket. Dial it back until the flame sits completely below the base of the pot.
For detailed temperature guidance specific to your stove type, including tips on using a moka pot on an induction stove, check our dedicated guides.
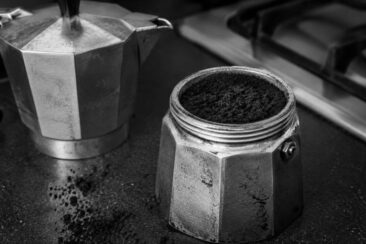
Wrong Grind Size Leads to Over-Extracted Coffee
Grind size controls how fast water can pass through the coffee bed, and getting it wrong is one of the fastest ways to end up with a cup that tastes burnt.
A grind that’s too fine, like an espresso grind, packs so tightly that water struggles to push through, staying in contact with the grounds far longer than it should and extracting harsh, acrid flavors.
Aim for a medium-fine grind, somewhere between the coarseness of table salt and the powdery texture of espresso.
If you are using pre-ground coffee labeled “espresso,” it may actually be too fine for a moka pot.
| Grind Size | Texture Comparison | Moka Pot Result |
|---|---|---|
| Too fine (espresso) | Powdered sugar | Bitter, burnt, slow extraction |
| Medium-fine (correct) | Table salt | Smooth, balanced, 4-7 min brew |
| Too coarse (drip/pour-over) | Coarse sand | Weak, watery, sour |
Blade grinders chop beans unevenly, producing a mix of dust and chunks that extract at wildly different rates and almost guarantee some portion of the bed will burn.
A quality burr grinder gives you the consistency a moka pot demands, where every particle is roughly the same size and extracts at the same rate.
How Coffee-to-Water Ratio Changes the Flavor
Too much coffee packed into the filter basket with too little water creates a dense puck that over-extracts and produces that familiar scorched bitterness.
Too little coffee with too much water yields a thin, sour cup that barely resembles what a moka pot should deliver.
The standard recommendation is a coffee-to-water ratio of roughly 1:7 to 1:10 by weight, meaning 1 gram of coffee for every 7 to 10 grams of water.
Most moka pots are designed to produce the right ratio when you fill the water to just below the safety valve and fill the filter basket level to the rim.
Fill the basket to the top, level it off, and never pack it down.
Water in the bottom chamber should sit just below the safety valve, never above it.
Common Mistake Measuring coffee by heaping scoops instead of by weight introduces inconsistency that changes the flavor of every brew. A small kitchen scale, even a $10 one, removes the guesswork.
If your brew regularly tastes too strong or too harsh, reduce the coffee dose by a gram or two and note the difference.
Why Leaving the Moka Pot on Heat Ruins Your Brew
The most overlooked cause of burnt moka pot coffee happens after the brew is already finished.
Once the water in the bottom chamber runs out, the remaining steam pushes through dry, overcooked grounds, sending scorched, ashy flavors straight into the upper chamber and directly into your cup.
Remove the moka pot from the heat the moment you hear the sputtering, hissing sound that signals the bottom chamber is nearly empty.
For an even cleaner finish, run cold water over the base of the pot right after you pull it off the stove, which immediately stops any residual extraction and prevents those last few seconds of burning.
Some of the best cups come from removing the pot just before the sputter starts, letting residual heat in the metal complete the final push of water.
Tamping, Overpacking, and Pot Size Mistakes
A moka pot is not an espresso machine, and pressing the grounds down into the basket the way you would tamp an espresso puck is one of the fastest ways to ruin the brew.
Packed-down grounds restrict water flow, increase pressure inside the pot, and force the water to stay in contact with the coffee far longer than intended, pulling out the same harsh, burnt compounds you get from an over-fine grind.
Fill the basket level to the rim and give it a light tap on the counter to settle the grounds, nothing more.
Before screwing the top chamber on, wipe any loose grounds off the rim of the basket, since stray coffee on the seal can create uneven extraction and a poor gasket fit.
Pot size matters here, too: a 6-cup moka pot used at half capacity changes the pressure dynamics inside the brewer and causes uneven extraction.
If you regularly brew small amounts, a 2-cup or 3-cup pot will give better results than a large pot filled halfway.
The caffeine content per cup can shift depending on pot size and extraction time, so matching your pot to your actual drinking habits keeps things consistent.
Do / Don’t
* Do fill the basket level and tap gently to settle
* Do match your pot size to how much coffee you actually drink
* Don’t tamp, press, or compact the grounds
* Don’t run a 6-cup pot at half capacity for a single serving
Your taste buds will notice the difference on the very first correctly loaded brew.
A smooth, sweet body replaces the burnt, harsh edge that overpacking creates.
How a Dirty or New Moka Pot Creates Burnt Flavors
Old coffee oils build up inside the filter plate, the gasket, and the walls of the upper chamber, coating every surface with a thin layer of rancid residue that makes every new cup taste stale and scorched.
That dark, oily film you can see clinging to the inside of the pot is not harmless seasoning, it is old fat turning bitter.
Disassemble your moka pot after every use and rinse the basket, filter plate, gasket, and chambers with warm water and a soft cloth.
Pay special attention to the small holes in the filter plate at the bottom of the upper chamber, where old grounds and oils collect and are easy to miss.
Once a week, do a thorough deep clean where you inspect the gasket for cracks or compression and check the safety valve for blockages.
A damaged gasket lets pressure escape during brewing, which disrupts extraction and often causes bitterness and uneven flow.
Replace gaskets once a year, or sooner if they look cracked, flattened, or no longer springy.
On the other end of the spectrum, a brand new moka pot can produce an odd metallic or slightly burnt flavor straight out of the box.
The fix is a break-in period: run two or three brew cycles using cheap coffee you plan to throw away, which seasons the interior surfaces and flushes out any manufacturing residue.
After those initial seasoning brews, the metallic edge disappears and the pot starts producing the smooth, rich cup you expected from the start.
Step-by-Step Checklist to Fix Burnt Moka Pot Coffee
Before your next brew, run through this list from top to bottom and check every box.
- [ ] Fill the bottom chamber with preheated water, up to just below the safety valve
- [ ] Add medium-fine ground coffee to the basket, level to the rim, no tamping
- [ ] Wipe the basket rim clean before screwing on the top chamber
- [ ] Place the pot on medium-low heat, not high
- [ ] Listen for the first quiet gurgle, then drop heat to the lowest setting
- [ ] Remove the pot from heat at the first sputter or hiss
- [ ] Run cold water over the base to stop residual extraction
- [ ] Pour immediately into your cup or a carafe
The entire brew should take 4 to 7 minutes from stove to cup.
If it finishes in under three minutes, your heat was too high, and the coffee will taste it.
Best Beans and Roast Level for Moka Pot Brewing
You can fix every technique mistake on this list and still get burnt-tasting coffee if your beans are stale, low quality, or roasted too dark for a moka pot’s intense extraction.
Fresh, well-sourced beans contain the natural sweetness and complexity that balance the bold, concentrated flavors the moka pot pulls out of the grounds.
Stale beans, or commodity-grade blends sitting on a shelf for months, have lost those balancing compounds, and what remains is flat, harsh, and bitter.
Look for freshly roasted whole-bean coffee with a roast date within the last two to four weeks, not just an expiration date printed eighteen months out.
Medium to medium-dark roasts extract most reliably in a moka pot, producing the chocolatey, full-bodied cup the method is known for.
| Roast Level | Flavor Profile in Moka Pot | Best For |
|---|---|---|
| Light roast | Bright, fruity, can taste sour if technique is off | Experienced brewers with precise heat control |
| Medium roast | Balanced, sweet, clean | Everyday drinking, black coffee |
| Medium-dark roast | Chocolatey, full-bodied, smooth | Classic moka pot flavor, milk drinks |
| Dark roast | Smoky, bitter, intense | Not recommended for moka pot brewing |
Very dark roasts already carry bitter, smoky compounds from the roasting process itself, and the moka pot’s concentrated extraction amplifies those flavors instead of softening them.
If you enjoy a strong cup with noticeable body and a clean finish, medium-dark is the sweet spot for this brewer.
Grinding those beans fresh right before brewing, rather than using pre-ground coffee that’s been open for weeks, makes a noticeable difference in every sip.
Pre-ground coffee loses aromatic oils within minutes of grinding, and those oils are what give your cup its richness, sweetness, and depth.
When the oils are gone, all that’s left are the flat, harsh notes that make you think the pot burned the coffee, when the real problem was the beans themselves.
A bean that smells rich and sweet before grinding should produce a cup with that same character, and if it doesn’t, the roast date on the bag is the first thing to check.
Final Thoughts
Burnt moka pot coffee comes down to a short list of fixable problems: too much heat, the wrong grind, a neglected pot, or beans that have seen better days.
Start with preheated water on medium-low heat, pull the pot off the stove at the first sign of sputtering, and the difference between a scorched cup and a smooth one will show up on the very first sip.