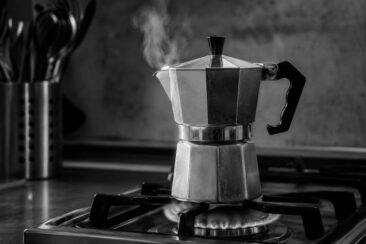
That low rumble rising from the stovetop, followed by a sharp sputter of steam and coffee spray, is one of the most common frustrations for moka pot users.
Sometimes the gurgling is completely normal, a signal that your brew is finished.
Other times it means something has gone wrong inside the pot, and the coffee collecting in the upper chamber is about to taste burnt, bitter, or thin.
The difference between the two comes down to timing, heat, and a few mechanical details that are easy to check once you know what to look for.
Quick Answer
A gentle gurgle near the end of brewing means your moka pot is done and should come off the heat immediately. Loud, early, or violent gurgling usually points to excessive heat, a worn gasket, incorrect water level, or a grind that is too fine. Most fixes take under a minute: lower the flame, check the seal, or adjust your coffee grind one notch coarser.
What That Gurgling Sound Actually Means
A moka pot brews by building steam pressure in the lower chamber, which pushes hot water up through the coffee grounds and into the upper chamber.
That process is surprisingly quiet for most of the brew cycle.
The water rises through the funnel in a steady stream you can watch if you leave the lid open, and the only sound is a faint hiss from the heating water below.
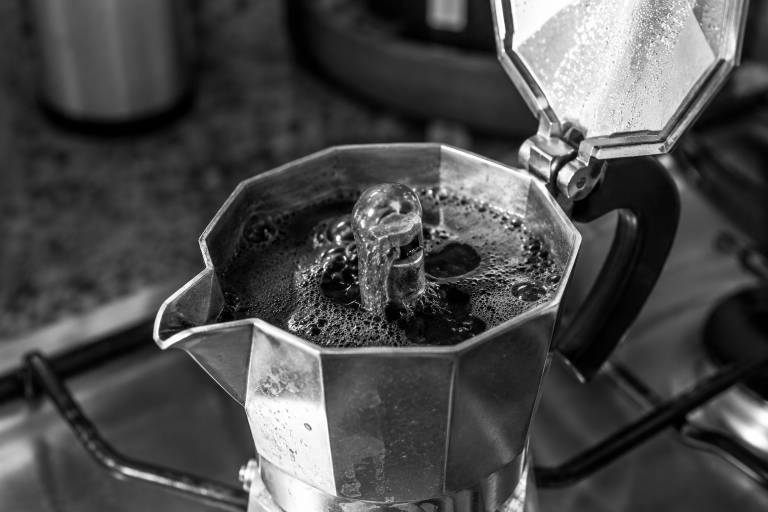
Gurgling starts when most of the water has already left the lower chamber.
At that point, steam and the last traces of water compete for space in the funnel, creating the bubbling, sputtering noise that moka pot users hear near the end of every brew.
If the gurgling arrives after the upper chamber is mostly full, that is the normal end-of-brew signal, and you should pull the pot off the heat right away.
Leaving it on the burner past that point allows steam to push through dry coffee grounds, which scorches the leftover residue and sends a burnt, ashy taste into your cup.
Quick Tip Listen for the shift from a smooth, quiet pour to a rough sputter. That transition is your cue to remove the pot from heat, not a sign that something is broken.
The problem starts when gurgling shows up too early, too loudly, or alongside visible steam escaping from the sides of the pot.
Early gurgling means pressure built too fast, and the water is being forced through the grounds before proper extraction can happen.
Violent sputtering can send hot coffee spraying out of the spout, which is messy at best and a burn risk at worst.
If your moka pot sounds angry within the first minute or two of heating, one of the causes below is almost certainly responsible.
Common Causes of Moka Pot Gurgling
Not every gurgling moka pot has the same underlying issue.
The five most frequent culprits are listed in the table below, along with the symptom each one creates and how quickly you can fix it.
| Cause | What You’ll Notice | Fix Time |
|---|---|---|
| Heat too high | Violent early sputtering, bitter coffee | 5 seconds |
| Worn or dirty gasket | Steam leaking from the joint between chambers | 1-2 minutes |
| Water level too low | Weak coffee, loud gurgling before the chamber fills | 30 seconds |
| Grind too fine or tamped too hard | Slow, pressurized brew followed by a sudden explosive sputter | 1-2 minutes |
| Clogged or missing safety valve | Excessive pressure, no steam release | 2-5 minutes |
Excessive Heat
Cranking the burner to high is the single fastest way to make a moka pot gurgle violently.
High heat boils the water too quickly, which spikes the internal pressure before the coffee grounds have time for a proper, even extraction.
The result is a sputtering pot and a cup that tastes harsh, with sharp bitterness clinging to the back of your tongue.
Medium-low heat gives the water time to rise gradually, which pulls more sweetness and body from the grounds.
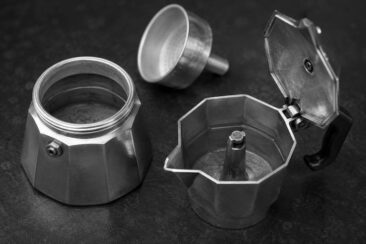
Worn or Dirty Gasket
The rubber ring between the upper and lower chambers creates an airtight seal that keeps steam pressure flowing in the right direction, upward through the coffee.
When that gasket gets old, cracked, or coated with oily coffee residue, it loses its grip.
Steam escapes sideways instead of pushing water through the grounds, and you hear erratic hissing and gurgling from the joint.
A damaged gasket needs to be replaced every 6 to 12 months with regular use.
Water Level Too Low
Filling the lower chamber only halfway leaves too much empty space for steam to build unchecked.
The pot pressurizes faster than it should, forcing water through the grounds in a rushed, uneven extraction.
Fill the lower chamber with water up to just below the safety valve, not above it and not far below it.
Too little water can produce a burnt, unpleasant taste from the grounds overheating before enough liquid passes through.
Grind Too Fine or Tamped Too Hard
Coffee ground to an espresso-fine powder, or packed down tightly into the filter basket, blocks the water’s path.
Pressure climbs in the lower chamber with nowhere to go until it finally punches through the compressed puck all at once, causing a loud pop and a spray of coffee from the spout.
The right grind for a moka pot is medium-fine, about the texture of table salt.
And you should never tamp the grounds in a moka pot filter basket; just level them off gently with your finger.
For a deeper look at getting the grind right, see the full moka pot grind size guide, and for the tamping question specifically, check out whether you should tamp a moka pot.
Common Mistake Treating a moka pot like an espresso machine and tamping the grounds flat. Moka pots generate 1-2 bars of pressure, not the 9 bars of an espresso machine. Tamping creates a barrier the lower pressure cannot push through evenly.
Clogged or Missing Safety Valve
Every moka pot has a small safety valve on the side of the lower chamber.
This valve is a pressure release that prevents the pot from building dangerous levels of steam if something blocks the normal flow of water.
If that valve is clogged with mineral scale or coffee residue, the pot has no way to vent excess pressure, and the result is aggressive sputtering, or worse.
Never use a moka pot with a missing or visibly damaged safety valve.
How to Fix a Gurgling Moka Pot
Once you have identified the likely cause, the fix usually takes less than two minutes.
Work through the following checklist in order, starting with the simplest adjustment.
- [ ] Turn the heat down to medium-low and wait for the brew to stabilize.
- [ ] Check the water level in the lower chamber; it should sit just below the safety valve.
- [ ] Inspect the gasket by unscrewing the upper chamber and looking for cracks, stiffness, or oily buildup on the rubber ring.
- [ ] Clean the filter plate and gasket by soaking them in warm water with a splash of white vinegar for 10-15 minutes.
- [ ] Coarsen your grind by one setting on your grinder, and do not press the grounds down into the basket.
- [ ] Clear the safety valve by gently pressing the pin with a toothpick to make sure it moves freely.
- [ ] Check the funnel and spout for clogs from old grounds stuck in the tube.
If the gurgling stops after adjusting the heat or water level, the remaining steps are just good maintenance habits to prevent the problem from coming back.
Beginner Note If your moka pot is stuck and won’t unscrew, run the bottom half under warm water for 30 seconds. The metal expands slightly with heat and usually loosens enough to twist apart by hand.
Cooling the Lower Chamber Mid-Brew
If you catch the pot sputtering early, you can save the brew without starting over.
Lift the moka pot off the burner and wrap the bottom chamber in a cold, damp kitchen towel for about 10 seconds.
This drops the temperature just enough to slow the pressure spike, and the brew often resumes at a calmer pace when you set it back on a lower flame.
You will hear the difference immediately: the angry rattling shifts to a soft, steady hiss, and the coffee stream in the upper chamber thins out into a smooth, honey-colored flow instead of a violent spray.
The Hot Water Trick That Prevents Bitter Gurgling
One technique that experienced moka pot users swear by is starting with hot water in the lower chamber instead of cold tap water.
The reasoning is straightforward.
Moka pots are made from aluminum, which conducts heat quickly.
When you put cold water in the bottom and place it on a flame, the metal body heats up faster than the water does.
That means the filter basket sitting above the water gets hot before the water even starts to boil, and the coffee grounds in direct contact with the heated metal begin to scorch.
The scorching produces a harsh, smoky bitterness that no amount of grind adjustment can fix.
Pre-heating your water in a kettle and pouring it into the lower chamber (just below the safety valve) before assembling the pot eliminates this problem entirely.
The water reaches brewing temperature faster, the grounds spend less time sitting on hot metal, and the extraction is cleaner from start to finish.
Quick Tip Use a folded towel or oven mitt to grip the lower chamber when screwing on the top, since the hot water makes the metal warm to the touch.
This method has a second benefit: shorter total brew time.
A moka pot filled with near-boiling water finishes in about 3-4 minutes instead of the 5-8 minutes a cold start takes.
Less time on the stove means less time for excess pressure to build, which directly reduces the risk of sputtering and gurgling.
Gurgling vs. Sputtering: Knowing the Difference
These two sounds get used interchangeably in most conversations about moka pots, but they describe different problems with different solutions.
| Gurgling | Sputtering | |
|---|---|---|
| Sound | Low bubbling or rumbling from inside the pot | Sharp hissing, spitting, or popping, sometimes spraying coffee |
| When it happens | Near the end of a normal brew cycle, or too early if something is off | During brewing, often from the sides or the spout |
| Cause | Steam and water mixing in the funnel as the lower chamber empties | Excess pressure escaping through weak seals or overpacked grounds |
| Risk level | Low if it happens at the end; medium if it happens early | Medium to high, since escaping steam can cause burns |
| Fix | Remove from heat at end-of-brew gurgle; lower heat if it starts early | Check gasket, lower heat, coarsen grind, do not tamp |
End-of-brew gurgling is normal and expected.
Sputtering during the middle of a brew is not normal and needs attention.
If you see coffee or steam escaping from anywhere other than the spout at the top, the pot either has a seal problem or the internal pressure is too high.
Stop the brew, let the pot cool, and inspect the gasket, the filter, and the safety valve before trying again.
Tips to Prevent Moka Pot Gurgling Long-Term
The best way to deal with gurgling is to prevent it from starting in the first place.
Stick to medium-low heat every single time you brew.
This one habit eliminates the majority of sputtering and early-gurgle issues.
Grind your coffee fresh if you can, and aim for a medium-fine consistency that feels like table salt between your fingers.
Pre-ground coffee marked for moka pots or stovetop espresso works fine too, as long as it is not labeled “espresso fine” or “Turkish.”
Clean the pot after every use by disassembling it and rinsing every part under warm water.
Pay attention to the filter plate, the rubber gasket, and the inside of the funnel, where old grounds and oils accumulate and mold can develop over time.
Common Mistake Washing a moka pot with soap. Soap strips the thin layer of coffee oil that builds up on the aluminum walls, and many moka pot users report that the coffee tastes metallic or flat after a soap wash. Warm water and a soft cloth are all you need.
Replace the rubber gasket and the filter plate once or twice a year, depending on how often you brew.
A fresh gasket creates a tighter seal, which keeps pressure flowing up through the grounds instead of leaking out the sides.
Store your moka pot disassembled and completely dry to prevent mineral deposits and musty odors from building up between uses.
When to Replace Your Moka Pot Entirely
Gaskets and filter plates are cheap, replaceable parts.
The pot itself, though, does wear out over time.
Aluminum moka pots are especially prone to oxidation, pitting, and mineral buildup on the interior walls after years of daily use.
Here are the signs that cleaning and replacement parts will no longer solve the problem:
- Deep pitting or rough, flaking metal inside the lower or upper chamber
- A persistent metallic taste in the coffee that does not improve after thorough cleaning
- Visible warping of the base, which prevents the pot from sitting flat on the burner
- Thread damage that makes the upper and lower chambers impossible to screw together tightly
- A safety valve that cannot be cleared or does not spring back when pressed
If your pot shows two or more of these symptoms, replacing it is safer and more cost-effective than continuing to troubleshoot.
A standard 3-cup Bialetti Moka Express costs around $30-$40, and a 6-cup version runs about $35-$50.
That is a small price for a pot that will brew without sputtering, leaking, or sending burnt-tasting coffee into your morning.
The Right Brewing Routine, Start to Finish
Putting all of these fixes and tips together, a clean moka pot brew follows a predictable pattern every time.
- Boil water in a kettle and pour it into the lower chamber up to just below the safety valve.
- Add medium-fine coffee to the filter basket, level it off without pressing down, and set the basket into the lower chamber.
- Screw on the upper chamber firmly using a towel to grip the warm base.
- Place the pot on medium-low heat with the lid up so you can watch the stream.
- Wait 3-4 minutes for coffee to begin rising into the upper chamber in a steady, honey-colored stream.
- When the stream lightens and the first gurgle starts, remove the pot from the heat immediately.
- Close the lid, pour, and enjoy.
Quick Tip Wrapping the base of the pot in a cold damp cloth right after removing it from the heat stops the extraction instantly. This prevents the last bit of steam from pushing through the dry grounds and adding bitterness to an otherwise clean cup.
That end-of-brew gurgle should be the only sound your moka pot makes beyond a quiet hiss.
If you hear anything louder, earlier, or accompanied by steam escaping from the sides, one of the fixes in this article will get you back to a clean, quiet brew.