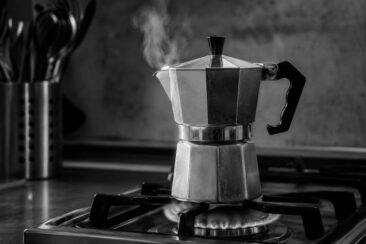
You filled your moka pot, set it on the stove, and waited for that familiar gurgle, only to find a pool of water still sitting in the bottom chamber.
That leftover water means your brew came out weak, under-extracted, and nowhere close to the thick, syrupy shot you were expecting.
The good news: every common cause has a straightforward fix, and most of them take less than five minutes.
This guide walks through the reasons a moka pot fails to push all its water through the coffee bed, then covers the exact adjustments, cleaning steps, and maintenance habits that get your brewer back to full extraction.
Is It Normal for Some Water to Stay in the Bottom Chamber?
A thin layer of water at the very bottom of the reservoir after brewing is completely normal.
That small amount of liquid, roughly 5 to 10 milliliters in a 6-cup Bialetti, protects the aluminum from scorching once the brewing cycle finishes.
The water sits below the opening of the funnel tube, which means the steam pressure that drives brewing can never physically reach it.
If you unscrew your moka pot and see water at or near the bottom of the funnel tube, your brewer is performing exactly as designed.
The problem starts when the water line sits well above that funnel opening, or when you notice a quarter-inch or more of liquid that clearly never made it through the coffee.
That signals a pressure failure, a blockage, or an assembly issue worth troubleshooting.
Overfilling the Water Reservoir
Pouring water above the safety valve is one of the fastest ways to leave unused water behind.
The safety valve sits at a specific height inside the bottom chamber to mark the maximum fill line, and covering it creates two problems at once.
First, excess water can drain through the valve itself, sputtering hot liquid out the side of the pot and reducing the volume available for brewing.
Second, an overfilled chamber leaves less air space for steam to build, which weakens the pressure needed to push water up through the coffee bed and into the upper chamber.
Fill to just below the bottom edge of the safety valve, leaving a visible gap between the water surface and the valve opening.
A 6-cup moka pot holds roughly 300 milliliters at the correct fill line, and even 20 extra milliliters can throw off the pressure balance.
If you have been filling by eye, try using a kitchen scale once to find the exact weight for your pot size, then mark the interior with a fine-tip marker as a quick visual reference.
Clogged Safety Valve
When mineral deposits, old coffee oils, or fine grounds lodge inside the safety valve, it can stick in a partially open position and vent steam before pressure builds high enough to complete the brew.
You will sometimes hear a faint, continuous hiss from the side of the pot instead of the steady gurgle from the spout, which is a clear sign the valve is leaking pressure.
A stuck-open valve means the steam that should be forcing water upward is escaping sideways, and the brewing cycle stalls with water still pooled in the chamber.
After each brew, press the valve pin gently with a toothpick to confirm it moves freely.
For deeper cleaning, soak the bottom chamber in a 1:1 solution of white vinegar and warm water for 20 to 30 minutes, then press the valve pin several times to dislodge any buildup.
Never attempt to unscrew or disassemble the valve itself, since doing so can damage the seal and turn a minor clog into a safety hazard that risks an explosion.
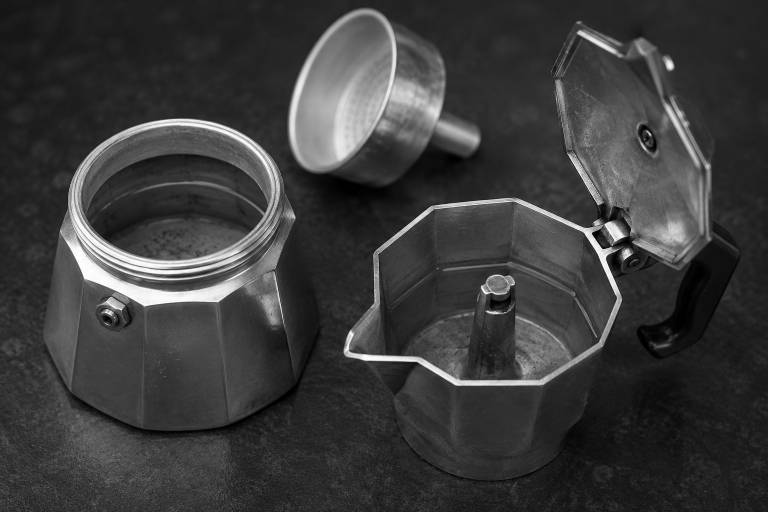
Blocked or Dirty Filter Screen
Coffee oils, mineral scale, and fine particles gradually coat the tiny perforations in the filter plate that sits between the gasket and the upper chamber.
When enough holes close up, water meets too much resistance and stalls in the lower chamber instead of rising into the collector.
Hold the filter plate up to a light after your next brew: if you cannot see pinpricks of light through most of the holes, the screen needs attention.
Scrub it with a soft nylon brush under warm running water after every use, working in small circles across the entire surface.
For stubborn buildup, soak the plate in white vinegar for 15 minutes, then scrub again until the perforations are clear.
Bialetti recommends replacing the filter plate and gasket together every 6 to 12 months with regular use, or sooner if you notice channeling or slow flow.
Worn or Damaged Gasket
The rubber ring that seals the upper and lower chambers loses flexibility over time, and once cracks or flat spots appear, steam escapes through the joint instead of traveling up through the coffee.
A hissing sound at the midsection of the pot during brewing, right where the two halves screw together, almost always points to a gasket that no longer holds a tight seal.
Steam loss at the gasket robs the chamber of the 1 to 2 bars of pressure a moka pot needs to complete extraction.
Inspect the gasket every few weeks by running a fingertip along the surface and checking for hard spots, cracks, or areas where the rubber has compressed permanently.
Replacing a moka pot gasket is inexpensive, usually under $5 for a pack of spares, and takes about 30 seconds.
Keep a spare gasket in your kitchen drawer so you never have to wait on a delivery for your morning coffee.
Coffee Grounds That Are Too Fine or Tamped Too Tight
Grounds packed into the filter basket like an espresso puck create far more resistance than the moka pot’s low-pressure system can overcome.
A moka pot generates roughly 1 to 2 bars of pressure, compared to 9 bars in a commercial espresso machine, so the coffee bed needs to stay loose and breathable.
If you tamp the grounds or use a grind as fine as powdered sugar, the water has no path forward and pools in the bottom chamber as pressure builds dangerously.
The correct grind size for a moka pot is medium-fine, about the texture of table salt.
Fill the basket to the rim, then level the surface with your fingertip or the flat side of a butter knife without pressing down.
Tap the side of the basket once or twice to settle the grounds, and brush any stray particles off the rim before screwing the pot together.
A clean rim matters: even a few granules caught between the gasket and the basket edge can break the seal and cause the same pressure leak as a worn gasket.
Insufficient or Excessive Heat
The heat source controls how fast steam builds in the lower chamber, and getting it wrong in either direction leaves water behind.
Too little heat means the water warms slowly, never generates enough sustained pressure, and the brew trickles to a stop before the chamber empties.
Too much heat forces water through the grounds so aggressively that the upper chamber fills with a thin, bitter, pale liquid, and the pot sputters violently, leaving a surprising amount of water below.
Medium to medium-low heat is the target for stovetop moka pots, and the coffee should take roughly 4 to 5 minutes from the moment you set the pot on the burner to the first audible gurgle.
On a gas range, keep the flame small enough that it does not lick past the edges of the pot’s base.
Induction and electric stove users should start at 40 to 50 percent of their burner’s range, then fine-tune based on brew time.
If your stovetop runs hot, consider using a heat diffuser plate to spread the energy more evenly across the bottom of the chamber.
Electric moka pots handle temperature control automatically, so if inconsistent heat is a recurring frustration, switching to an electric model removes the guesswork.
The Ice Bath Trick to Stop Brewing at the Right Moment
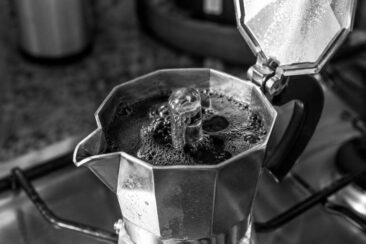
Removing the pot from heat at the right second prevents the harsh, sputtering tail end of the brew from ruining the cup.
Once you hear the first airy gurgle from the spout, the chamber is nearly empty and the remaining liquid is mostly steam pushing through the last traces of water.
Lift the pot off the burner and set the base into a shallow bowl of cold water or wrap the bottom with a cold, wet towel.
The sudden temperature drop kills the steam pressure instantly, halting extraction before the brew turns bitter.
This technique, borrowed from competition-level baristas and championed by James Hoffmann, reduces the metallic taste that sometimes creeps into the final seconds of an aluminum pot’s brew cycle.
Using Hot or Cold Water to Start Your Brew
Starting with pre-heated water shortens the time the pot sits on the stove, which reduces the risk of overheating the grounds before brewing even begins.
Pour water from a kettle that has just come off the boil into the bottom chamber, then assemble the pot quickly using a towel or oven mitt to hold the hot base.
The shorter heat exposure produces a cleaner, sweeter cup with less of the burnt, ashy taste that plagues long brew cycles.
Cold-start brewing works too, and it is the traditional Italian method, but it requires more careful heat management to avoid scorching the grounds during the longer warm-up period.
If you choose a cold start with room-temperature filtered water, keep the flame low and stay near the stove so you can react the moment the coffee begins flowing.
Keeping Your Moka Pot Clean
Residue from old brews coats every interior surface over time: the funnel walls, the filter perforations, the gasket groove, and the inside of the upper chamber’s spout.
That buildup narrows passages, reduces flow, and introduces stale, rancid flavors into every new cup.
After each use, disassemble all three sections and rinse them under warm running water, using your fingers or a soft cloth to wipe away oily film.
Avoid dish soap on aluminum moka pots, since detergent strips the seasoned coffee-oil patina that protects the metal and improves flavor over time.
For a deeper monthly cleaning of your moka pot, fill the lower chamber with equal parts white vinegar and water, then run a full brew cycle without coffee in the basket.
Rinse all parts thoroughly afterward and let them air dry completely before reassembling, since trapped moisture between the gasket and the metal can encourage corrosion.
If you have hard tap water, consider switching to filtered water for everyday brewing: it slows mineral scale buildup inside the chamber and on the filter plate, and it removes chlorine that can flatten the taste of your coffee.
Troubleshooting Checklist
When your moka pot leaves too much water behind, run through these checks in order:
| Check | What to Look For | Fix |
|---|---|---|
| Water level | Water above the safety valve | Fill to just below the valve |
| Safety valve | Hissing from the side of the pot | Clean with vinegar soak, press pin with toothpick |
| Filter plate | Blocked perforations, slow flow | Scrub under water, soak in vinegar, replace if worn |
| Gasket | Cracks, flat spots, hissing at the joint | Replace the rubber ring |
| Grind size | Powder-fine grounds or tamped basket | Switch to medium-fine, do not tamp |
| Heat level | Brew finishes in under 2 min or over 7 min | Adjust to medium-low, aim for 4 to 5 minutes |
| Assembly | Loose connection between chambers | Hand-tighten firmly without over-torquing |
When the Problem Is Not User Error
Sometimes the pot itself is the issue, not the technique.
Aluminum threads can warp after years of use, preventing a tight seal no matter how carefully you screw the chambers together.
Cheap knockoff pots sometimes ship with poorly machined filter baskets where the perforations are inconsistent, creating uneven flow from day one.
A corroded or pitted interior on the bottom chamber can trap mineral deposits in places no brush can reach.
If you have replaced the gasket, cleaned every component, confirmed your grind and water level, and still see too much water left behind, the pot may have reached the end of its working life.
A quality Bialetti Moka Express costs roughly $25 to $40 depending on size, and a fresh pot eliminates every accumulated wear issue at once.
Not all moka pot problems come down to a single cause, so replacing the whole unit sometimes saves more time and frustration than chasing a hidden defect.
Getting Your Moka Pot Seasoned for Better Performance
A brand-new moka pot straight from the box often produces metallic, flat coffee and may behave unpredictably with water flow until the interior develops a protective layer of coffee oils.
Seasoning means running two or three full brew cycles with coffee you plan to throw away, letting the oils coat the aluminum walls, the funnel, and the filter plate.
After seasoning, the interior surface becomes smoother and less reactive, which improves water flow, reduces off-flavors, and helps the gasket seat more consistently against the oiled metal.
Skipping this step is one of the hidden reasons a new moka pot underperforms compared to a well-used one.
One Fix at a Time
The temptation when your moka pot misbehaves is to change five things at once: new grind, new water level, new heat setting, and a deep clean all in the same session.
That approach makes it impossible to know which adjustment actually solved the problem, and you will be right back to guessing the next time something feels off.
Pick the most likely culprit from the troubleshooting table, change only that variable, and brew a test pot.
If the water level drops further, you found it.
If not, move to the next item on the list and test again.
Methodical, one-variable adjustments turn a frustrating morning into a repeatable system that keeps every cup tasting the way you want it.