That bag of pre-ground Folgers or Kirkland Signature sitting on your counter right now can absolutely go into a moka pot.
The moka pot, designed by Luigi De Ponti and patented by Alfonso Bialetti in 1933, brews coffee by pushing steam-pressurized water up through a basket of grounds at about 1.5 bars of pressure.
That concentrated brewing method is why it produces coffee roughly twice as strong as a drip machine, closer to espresso in body.
The thick, syrupy mouthfeel you get from this stovetop brewer is something you will never get from a Mr. Coffee.
Regular grocery store coffee works fine in this little aluminum brewer, as long as you pay attention to three things: grind size, ratio, and heat.
Get those three right and you will pull a dark, aromatic cup that smells like toasted hazelnuts and tastes richer than anything your drip machine has ever made.
Get them wrong and you will end up with a mug of thin, bitter liquid that tastes like it was boiled in a tin can.
This guide covers every adjustment you need.
Does Regular Coffee Work in a Moka Pot?
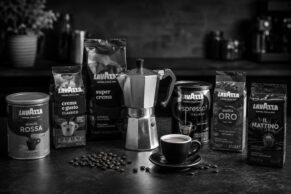
Yes, and millions of Italian households have been doing it for decades with grocery store coffee from brands like Lavazza and Illy.
The brewer was built for everyday coffee, not specialty single-origin micro-lots.
What matters is matching the coffee to the brewer’s specific extraction style: a short, pressurized contact between hot water and grounds that rewards a finer grind and a darker roast more than a drip machine would.
Regular pre-ground coffee from a supermarket can produce a satisfying, full-bodied cup if you make two or three small tweaks to how you load and brew the pot.
Those tweaks are covered in the sections that follow, starting with the single most impactful variable.
Grind Size: The Biggest Factor for Regular Coffee
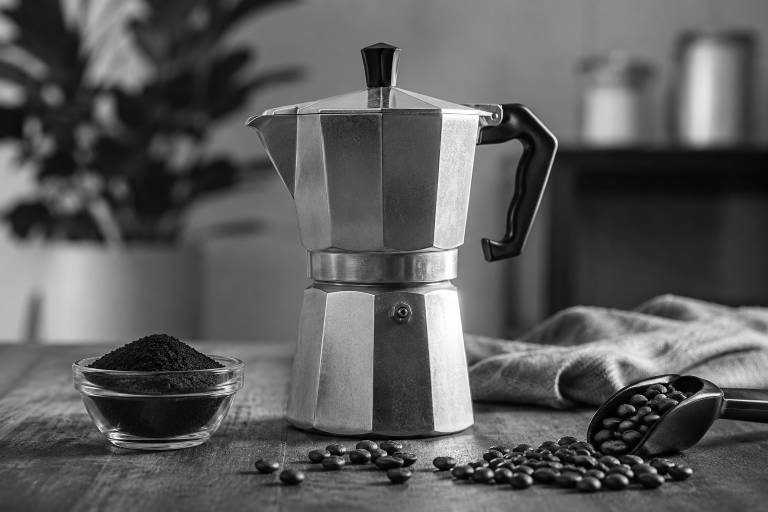
A moka pot needs a medium-fine grind, roughly the texture of table salt when you pinch it between your fingers.
That falls between the powdery fineness of espresso (200-300 microns) and the coarser sand of drip coffee (600-800 microns), landing somewhere around 400-600 microns.
Most pre-ground regular coffee from grocery stores is ground for drip machines, which means the particles are too coarse for this brewer’s pressurized extraction.
When the grind is too coarse, water rushes through the basket without extracting enough flavor, and what pours into the top chamber tastes thin, sour, and closer to dirty dishwater than the concentrated brew the pot was designed to make.
When the grind is too fine, the opposite happens: water cannot push through the compacted bed of grounds, pressure spikes dangerously inside the lower chamber, and whatever coffee does come out tastes scorched, ashy, and so bitter it makes you wince.
| Grind Size | Texture | Moka Pot Result |
|---|---|---|
| Too coarse (drip grind) | Coarse sand | Weak, sour, watery brew |
| Medium-fine (correct) | Table salt | Concentrated, balanced, full-bodied |
| Too fine (espresso grind) | Powdered sugar | Bitter, over-extracted, possible clog |
Grinding your own beans at home, even with a $25 manual burr grinder, gives you the most control over this variable.
If you are buying pre-ground, look for packages labeled “moka pot” or “stovetop espresso,” which are ground to roughly the right size.
A bag labeled “espresso” at the grocery store is often ground finer than what the pot needs, so start there only if nothing else is available and expect a slightly more bitter cup.
Coffee-to-Water Ratio for Moka Pot Brewing
The pot’s design naturally pushes you toward the right ratio: fill the water chamber to just below the safety valve, fill the filter basket level to the rim, and the brewer does the math for you.
For anyone who wants exact numbers, the standard starting point is a 1:10 ratio by weight, meaning 1 gram of coffee for every 10 grams of water.
A 3-cup moka pot uses about 15 grams of coffee and 150 milliliters of water at that ratio, producing a small, concentrated serving with a bittersweet intensity similar to a long espresso shot.
| Desired Strength | Ratio (coffee:water) | Taste Profile |
|---|---|---|
| Strong (espresso-like) | 1:7 | Dense body, chocolatey bitterness, sipping strength |
| Standard moka | 1:10 | Balanced, full-flavored, slightly less intense |
| Lighter (Americano-style) | 1:12 to 1:15 | Smoother, milder, works well with milk |
Going below 1:7 (more coffee, less water) risks over-extraction and a harsh, acrid taste that no amount of sugar can fix.
Going above 1:15 stretches the brew into weak territory where you lose the pot’s whole reason for existing.
The original version of this article listed a 1:1 ratio for strong coffee, which is incorrect and would be physically impossible in a standard moka pot.
Stick to the 1:7 to 1:10 range for your first few brews, then adjust by small increments until the cup matches your preference.
How Roast Level Changes Your Moka Pot Brew
Dark roasts are the traditional choice across Italy and Latin America, and for good reason.
The brewer’s high temperature (water reaches a full boil, around 100°C, compared to the 92-96°C sweet spot of espresso machines) pairs well with the lower acidity and heavier body of a dark roast.
A dark roast through the pot produces a cup with a smoky, caramelized sweetness and a thick coating on the tongue, almost like dark chocolate melted into black coffee.
Medium roasts strike a middle ground, offering more sweetness and a hint of nuttiness without the charred edge that some dark roasts carry.
Light roasts are trickier: the high heat and short extraction time can amplify sourness and produce a thin, tea-like body that surprises people who expected the pot’s usual punch.
If your regular coffee is a medium roast from the grocery store, you are already in a good range without any roast-related adjustments, and brands like Lavazza, Illy, and Bustelo roast their stovetop blends on the darker side for exactly this reason.
Step-by-Step: Brewing Regular Coffee in a Moka Pot
This walkthrough works for any regular pre-ground or freshly ground coffee in a standard stovetop moka pot.
- Boil water separately in a kettle before loading the pot, then let it cool for about 30 seconds until it stops bubbling.
- Pour the hot water into the pot’s lower chamber, filling to just below the safety valve (the small bolt on the side), never above it.
- Fill the filter basket with ground coffee, leveling it off with your finger or a knife.
- Do not tamp or press the grounds down. The brewer generates only 1.5 bars of pressure, and compacting the coffee bed chokes the water flow, which leads to channeling, uneven extraction, and a burnt-tasting cup.
- Wipe the rim of the lower chamber clean so no stray grounds interfere with the seal.
- Screw the top chamber on firmly using a towel to grip the hot lower chamber.
- Place the pot on medium-low heat. On a gas stove, keep the flame smaller than the base of the pot so it does not lick up around the sides or scorch the handle.
- Leave the lid open and watch for coffee to begin rising into the top chamber, which should take 3-5 minutes.
- Listen for a hissing, gurgling sound. When the stream turns from dark brown to pale and sputtery, remove the pot from the heat immediately.
- Wrap the base in a cold, damp towel or run it under cold tap water for two seconds to stop extraction and prevent the last drops from turning bitter.
Starting with pre-heated water instead of cold water is the single biggest improvement most people can make, cutting brew time in half and preventing the grounds from cooking on the stove as the water slowly heats.
That cooking is what produces the burnt, metallic taste many people associate with stovetop brewers.
Common Mistakes That Ruin Moka Pot Coffee
Every bitter, watery, or sputtering stovetop brew comes down to one of these fixable errors.
Using too much heat. Cranking the burner to high forces water through the grounds too fast, scorching the coffee and producing a bitter, smoky aftertaste that clings to the back of your throat.
Medium-low heat gives the water time to extract flavor evenly.
Leaving the pot on the stove after it finishes. The residual heat continues to boil the coffee in the top chamber, turning it increasingly bitter with every extra second.
Pull the pot off the burner the moment the stream lightens in color.
Tamping the grounds. Unlike an espresso machine that operates at 9 bars of pressure, the pot’s 1.5 bars cannot push water through a compacted puck.
Tamped grounds create channeling, where water carves narrow paths through the coffee and over-extracts those channels into a scorched, undrinkable brew.
Overfilling the water chamber. Water above the safety valve disrupts the pressure balance and can cause leaks, steam spitting, or weak extraction.
Neglecting the gasket and filter plate. Old, cracked gaskets leak steam, dropping internal pressure and producing thin coffee that tastes like hot water with a coffee-colored tint.
Replace the rubber gasket and the metal filter screen every 6-12 months, or sooner if you notice steam escaping from the sides during brewing.
Pre-Ground vs Whole Bean: What Freshness Costs You
Regular coffee from a grocery store is almost always pre-ground, and that convenience comes with a trade-off you can taste.
Coffee begins losing its volatile aromatic compounds within 15 minutes of grinding, and a bag of pre-ground coffee that has been sitting on a shelf for weeks or months will taste flat, stale, and one-dimensional compared to beans ground fresh that morning.
You can still get a good cup from pre-ground coffee in the pot, but the ceiling for flavor is lower.
The difference is audible before it is tasteable: freshly ground beans release a loud, fragrant burst of caramel and fruit when the grinder cracks them open, and that aroma carries directly into the brewed cup.
A bag of pre-ground Folgers, by comparison, smells like coffee in the way a photograph of a sunset looks like a sunset.
For the best results with regular coffee, buy whole beans from the grocery store (Lavazza, Illy, and Cafe Bustelo all sell whole bean options) and grind them at home right before brewing.
A manual burr grinder costs around $20-$30 and produces a far more consistent, even grind than the blade grinders most people already own.
If you stick with pre-ground, store the bag sealed in a cool, dark cabinet, never in the refrigerator or freezer, where moisture condenses on the grounds and accelerates staleness.
Pros and Cons of Using Regular Coffee in a Moka Pot
| Factor | Regular Coffee | Specialty Coffee |
|---|---|---|
| Price per 12 oz bag | $5-$10 | $14-$22 |
| Availability | Every grocery store, gas station, corner shop | Specialty roasters, online, select stores |
| Grind consistency | Variable, often too coarse for moka pots | Usually consistent, often moka-specific grinds available |
| Freshness | Weeks to months post-roast | Usually roasted within 1-2 weeks of purchase |
| Flavor range | Reliable, familiar, narrower | Fruity, floral, nutty, or chocolatey depending on origin |
| Moka pot compatibility | Works with adjustments | Works out of the box |
Regular coffee makes sense when you want an affordable, low-effort daily brew and you are happy with a straightforward coffee flavor.
The main downside is grind size mismatch, since most regular coffee is ground for drip machines and runs too coarse for ideal moka extraction.
A secondary downside is freshness: pre-ground regular coffee has usually been sitting on a shelf long enough to lose the aromatic complexity that makes specialty coffee taste layered and interesting.
Neither of those downsides makes grocery store coffee a bad choice, they just set realistic expectations for what the cup will taste like.
Picking the Right Regular Coffee at the Grocery Store
Not all grocery store coffee performs equally in a stovetop brewer, and a few quick label checks can save you from a disappointing brew.
Look for bags labeled “espresso grind,” “moka pot,” or “stovetop” first, since these are ground to a finer size that matches the brewer’s needs.
If none of those labels are on the shelf, choose a dark or medium-dark roast from a brand like Lavazza, Illy, or Cafe Bustelo, all of which are formulated with Italian-style brewing in mind.
Avoid anything labeled “coarse grind” or “French press,” which will produce weak, under-extracted coffee in the pot.
When choosing the right coffee for your moka pot, check the roast date if it is printed on the bag.
Coffee roasted within the last month will taste noticeably more alive than a bag with no date at all, which has likely been sitting in a warehouse for much longer.
A 12-ounce bag of Lavazza Crema e Gusto or Cafe Bustelo espresso grind runs about $6-$8 at most supermarkets and produces 20-25 stovetop brews, putting your per-cup cost around $0.30 compared to $4-$6 for a cafe espresso drink.
When Specialty Coffee Is Worth the Upgrade
Specialty coffee, graded 80 points or higher by certified Q graders, offers flavor complexity that regular coffee cannot match in this brewer.
A single-origin Ethiopian through the pot can taste like blueberry jam stirred into dark chocolate.
A Colombian lot, by comparison, might carry a caramel sweetness with a bright, citrusy finish that lingers on the tongue.
Regular coffee, by contrast, delivers a flatter, more uniform flavor profile that leans on roast character (smoky, bitter, nutty) rather than bean origin.
The concentrated extraction amplifies whatever flavors are in the bean, which means high-quality beans with interesting flavor notes translate into a more expressive, layered cup.
If you have been enjoying your stovetop brewer with regular coffee and want to hear what it is actually capable of, try one bag of freshly roasted specialty beans ground to medium-fine.
The crema that specialty beans produce, a thin layer of golden foam on the surface, adds a velvety texture you will rarely see with stale pre-ground coffee.
That single upgrade, from a $7 bag of grocery store coffee to a $15 bag of freshly roasted beans, is the largest flavor jump you can make without changing your equipment.
Final Thoughts
Regular coffee belongs in a moka pot, and anyone who tells you otherwise is overthinking a brewer that was designed for everyday Italian kitchens, not specialty coffee competitions.
Grind to the texture of table salt, fill the water to the safety valve, keep the heat on medium-low, and pull the pot off the burner the second it starts to sputter.
Those four moves will turn a $6 bag of grocery store coffee into something that tastes closer to a cafe espresso than anything your drip machine has ever produced.
If you want to push further, switch to whole beans and grind them fresh, or try one bag of specialty coffee and taste the difference the pot can pull from better beans.
The brewer is simple, forgiving, and built to last decades with nothing more than hot water and a stovetop.