A Moka Pot is a beloved coffee maker for many enthusiasts, known for brewing rich and flavorful espresso right on your stovetop.
However, your Moka Pot can sometimes become frustratingly stuck for various reasons, such as overpacked grounds or a worn-out gasket.
But don’t worry – we’ve got you covered!
Here, we will reveal five easy tips and tricks to help you fix a stuck Moka Pot to continue enjoying your favorite cup of Joe without any hassle.
Key Takeaways
- An overpacked filter basket, dirty or worn-out gasket, incorrect grind size, and high heat setting are common reasons for a stuck Moka pot.
- To release a stuck Moka pot, try using hot water to loosen parts, gently tapping or twisting the pot, regularly cleaning the filter and brew basket, using a rubber band or cloth for better grip, or running cold water over the bottom section.
- Prevention is critical to avoiding a stuck Moka pot in the future. Use the correct grind size and amount of coffee grounds, clean the gasket and filter basket regularly, adjust heat settings appropriately, and remove from heat once coffee starts gurgling; ensure proper assembly/disassembly every time you use it.
Causes of a Stuck Moka Pot
Your Moka Pot might be stuck due to an overpacked filter basket, dirty or worn-out gasket, incorrect grind size, or a high heat setting.
1. Overpacked Filter Basket
An overpacked filter basket is a common culprit behind a stuck Moka Pot.
Adding too much coffee to the basket creates unnecessary pressure and resistance in the brewing process, making it difficult for water to pass through the grounds and into your coffee.
Always use the correct amount of coffee for your pot size to avoid this issue.
A general rule of thumb is one heaping tablespoon per 3-ounce serving.
When filling the filter basket, gently level the coffee grounds with your fingers or a knife instead of compacting them tightly – creating room for water flow without causing strain on the brewing process.
Additionally, your Moka has a safety valve to release excess pressure, ensuring a smoother brewing experience and preventing overpressure scenarios. Remember to check the valve regularly to ensure it’s functioning properly.
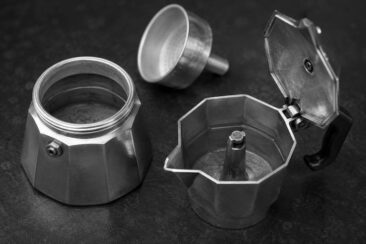
2. Dirty Or Worn-Out Gasket
A dirty or worn-out gasket is a common culprit behind a stuck Moka Pot.
The silicon gasket creates an air-tight seal between your coffee maker’s top and bottom sections, ensuring that steam and water pressure rise properly during brewing.
Similarly, constantly using your espresso maker may cause wear and tear on the rubber material.
As it loses elasticity over time, it becomes less capable of properly sealing between both halves of your stovetop coffee maker.
Consequently, leakage occurs around the middle part of your Moka Pot as water escapes when you try to brew coffee – leading to decreased pressure inside and causing your Moka Pot to become stuck.
A quick solution for this issue is to inspect the gasket for visible damage or grime buildup and replace it if necessary.
3. Incorrect Grind Size
Using the incorrect grind size for your Moka Pot can be a significant factor in causing it to become stuck.
Many coffee enthusiasts might not realize that choosing the appropriate grind is crucial in brewing with this traditional Italian stovetop espresso maker.
A too-coarse grind may result in water passing through the coffee grounds too quickly, which leads to weak or under-extracted coffee.
On the other hand, using an overly fine grind, similar to what you would use for an espresso machine, increases the chances of clogging your filter plate and causing your Moka Pot to get stuck during brewing.
This issue is often indicated by stalling during the pour-over process and could be due to over-extracting fines – micro dust created when grinding coffee beans.
4. High Heat Setting
One common mistake when using a Moka Pot is setting it to too high heat.
This can cause the coffee to brew too quickly, leading to an overheated handle and potential blockages.
Depending on your stove, it’s important to use medium or low heat and closely monitor the brewing process.
Overheating can also scorch the coffee grounds and leave behind residual buildup that makes it difficult for parts of the Moka Pot to move smoothly.
Troubleshooting Tips for Stuck Moka Pots
To release a stuck Moka Pot, gently tap or twist it after running it under hot water. Cleaning the filter and brew basket can also help. Use a rubber band or run cold water over the bottom section for a better grip.
Continue reading for detailed solutions!
1. Loosen Parts with Hot Water
Hot water can be your savior if you’re dealing with a stubbornly stuck Pot.
Fill a bowl or sink with hot water and submerge the bottom section of the pot for a few minutes.
This will help loosen any built-up coffee grounds or residue causing the issue.
Another helpful trick is to pour some hot water into the bottom chamber before brewing, as this will preheat it and allow for more efficient extraction without creating pressure issues leading to sticking parts.
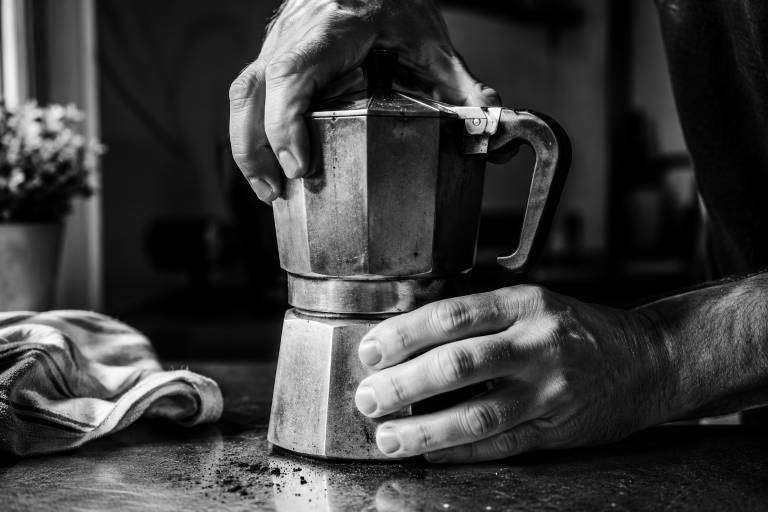
2. Gently Tap or Twist
If your Moka Pot is stuck, gently tapping or twisting it could help loosen up the components.
This technique can be effective if there’s a buildup of coffee grounds or residue inside the pot.
It’s best to tap or twist in small increments until you feel some movement.
If you’re still having trouble, try using hot water to loosen things up before tapping or twisting again.
3. Clean the Filter and Brew Basket
Keeping the filter and brew basket clean is essential to prevent a Moka Pot from getting stuck.
These components can become clogged with coffee grounds or oils over time, affecting the quality of your brewed coffee.
In particular, the filter can be prone to “coffee stuck” issues, where residual grounds impede the brewing process.
To clean them, remove them gently using a butter knife and rinse them thoroughly under hot water.
Once you’ve removed any stubborn stains or buildup in these parts, dry them thoroughly before re-assembling the Moka Pot.
The absence of moisture prevents rusting and helps improve the longevity of your coffee maker.
Regular cleaning of these parts improves the taste and experience of brewing with a Moka Pot, ensuring no unwanted flavors interfere with your brewed drink.
4. Improve Grip with a Rubber Band or Cloth
Use a rubber band or cloth for more traction if you struggle to grip your stuck Moka Pot well.
Wrap the rubber band or cloth around the top section’s handle and wrap it around the bottom section as needed for better leverage.
One important point to remember is that when using this method, be sure not to apply too much force as it could damage or break your Moka Pot.
Gently but firmly turning and twisting should do the trick.
5. Cool the Bottom Section with Cold Water
If your Moka Pot is stuck and won’t budge, running cold water over the bottom section can help to loosen any stubborn coffee grounds or residue.
This method works by contracting the metal of the bottom section, causing it to shrink slightly and break free from any blockage that may be holding it in place.
To do this, turn on your faucet and run a gentle stream of cold water over the bottom section for about 30 seconds.
Be sure not to use hot water, which could cause the Moka Pot to heat up too quickly and potentially cause damage.
Remember that prevention is key to avoiding a stuck Moka Pot.
Preventing Future Issues
To avoid a stuck Moka Pot, use the appropriate grind size and quantity of coffee. Regular cleaning of the gasket and filter basket is crucial.
Also, adjust the heat setting appropriately and remove the pot from heat as soon as the coffee begins to gurgle. Also, pay careful attention to proper assembly and disassembly techniques.
By adhering to these straightforward steps, you can consistently enjoy delicious stovetop coffee without the hassle of a stuck or clogged Moka P
1. Use The Correct Grind Size And Amount
Using the correct grind size and amount of coffee is crucial in preventing a stuck Moka Pot.
The ideal grind size for a Moka Pot should fall somewhere between drip and espresso, leaning towards the finer side.
Overloading your filter basket with too much coffee can cause clogs and lead to a stuck pot.
On average, you’ll need one tablespoon of ground coffee per four ounces of water; adjust accordingly based on your desired strength.
2. Clean The Gasket and Filter Basket Regularly
Regular gasket, filter, and central pipe cleaning is crucial in maintaining a functional Moka Pot.
Over time, coffee oils can build up on these parts, causing them to become sticky or clogged.
To prevent a stuck Moka Pot, remove the filter basket from the brew head and clean it using warm water and a soft-bristle brush or butter knife.
If you notice any signs of wear and tear on either part, such as cracks or tears in the gaskets, it’s important to replace them immediately.
Failure to do so may result in leaks or further malfunctions with your stovetop coffee maker.
3. Adjust The Heat Setting
One of the easiest ways to prevent a stuck Moka Pot is by adjusting the heat setting.
It’s important not to set the heat too high, as this can cause the handle to get hot and potentially damage your pot.
A lower heat setting allows for a slower extraction process, which results in a smoother and more flavorful coffee.
Additionally, when using a smaller burner on your stove that matches the size of your Moka Pot, you’ll avoid overheating and reduce the chances of getting it stuck.
With an appropriate heat level, you’ll also avoid fracturing or warping any parts within the Moka Pot due to extreme temperature changes.
Did you know that Moka pots work by forcing hot water under pressure upward through a puck of coffee grounds set in our filter basket?
A high-heat setting could cause too much pressure buildup inside, leading to blockages and over-extraction, turning even good grinds into bitter ones while leaving others unbrewed entirely – making sticking worse where breakdowns would become inevitable!
Using these tips for adjusting temperatures correctly or regular cleaning with vinegar solutions (as mentioned later), we can continue enjoying delicious cups made quickly without worrying about deteriorating materials or losing great-tasting caffeine jolts!
4. Remove From Heat Once Coffee Starts To Gurgle
If you want to avoid a stuck Moka Pot, it’s important to remove it from the heat source once the coffee starts to gurgle.
This is because when the water in the bottom chamber heats up and creates pressure, it forces the hot water through the coffee grounds and into the top chamber.
However, if you leave your Moka Pot on high heat after this point, your coffee will become over-extracted and bitter, and there’s also a risk of causing damage or injury due to excessive pressure buildup.
5. Proper Assembly And Disassembly
Proper assembly and disassembly of your Moka Pot are crucial to keeping it from getting stuck during use.
Before assembling your Moka Pot, ensure all the parts are clean and in good working condition.
When inserting the filter basket, ensure it’s seated correctly in the bottom section before screwing on the top half.
Over-tightening can damage the threads or cause warping of the metal, which could lead to a problematic disassembly later on.
When disassembling your Moka Pot, let it cool down first before taking apart any of its components, as high temperatures can loosen some elements while expanding others.
Cleaning and Maintaining Your Moka Pot
Cleaning and maintaining your Moka Pot ensures its longevity and avoids brewing hiccups.
Here, we’ll provide tips on properly cleaning your pot using distilled white vinegar and wiping it down with paper towels or cotton cloths.
We’ll also share storage and maintenance tips to keep your beloved stovetop coffee maker in shape for years.
1. Using Distilled White Vinegar
Distilled white vinegar is one of the best ways to clean and maintain your Moka Pot.
This natural solution effectively removes built-up residue without being corrosive or damaging the coffee maker.
Mix equal parts water and vinegar in a separate container, then pour the mixture into the bottom section of the Moka Pot.
Let it sit for 15-20 minutes before rinsing thoroughly with warm water.
Regularly cleaning your Moka Pot with distilled white vinegar helps remove any unwanted buildup and ensures you’re brewing a flavorful cup of coffee each time.
2. Wiping With Paper Towels Or White Cotton
Regular maintenance of Moka Pots is crucial for its longevity and appearance.
After each use, wiping it with paper towels or white cotton can prevent residue buildup, especially on parts exposed to water. This practice keeps your pot pristine and protects it against rust and corrosion.
It’s recommended to disassemble and meticulously clean your Moka Pot, including the filter basket, at least monthly.
Paper towels or white cotton is also an effective, gentle method for removing surface stains without using harsh chemicals that might harm the pot’s material.
To preserve both the functional and aesthetic qualities of your Moka Pot, consider natural cleaners like baking soda, white vinegar, or lemon juice. These are excellent choices for maintaining your pot without the risk of scratching or damaging its surface.
3. Storage and Maintenance Best Practices
Proper storage and maintenance are crucial to ensure your Moka Pot’s longevity.
After cleaning and drying thoroughly, store the Moka Pot in a dry place to prevent moisture from accumulating.
Regular cleaning is essential to prevent clogs and maintain optimal brewing conditions.
Descaling with white vinegar or lemon juice should be done every few months to remove buildup from hard water deposits.
Replacing gaskets every six months can help ensure a tight seal for proper brewing pressure.
Final Thoughts
Fixing a stuck Moka Pot doesn’t have to be a daunting task.
By understanding the common causes, such as scale buildup or misaligned parts, and implementing the tips mentioned above, you can quickly troubleshoot and resolve issues with your stovetop espresso maker.
Regular maintenance and appropriate use of products like descaling solutions can further enhance the longevity and performance of your Moka Pot.
Use the correct grind size and amount, regularly clean your gasket and filter basket, adjust heat settings, and disassemble carefully to enjoy your espresso without any hassle.